
How to Label Plants or Concept Plants
Updated on: October 15, 2025
Quick video

- Plant Labeling Overview
- Labeling Groundcover and Shrub Area Hatches
- Labeling Planting Hatches With the Group, Connecting Line, and Connecting Arc Tools
- Plant Quantity vs. Hatch Area
- Our Updated Plant Label Styles, Including MLeaders
- Labeling Concept Plants
- Plant/Concept Plant Labels and Slope Areas
- Locating Plants to Label Using the Plant Highlight Tool
- Plant Code Styles
- Label Plants With Photo Callouts
- Plant Label Scale
- Extension Lines
- Label in Paper Space
- Including Superscripts in Your Plant Labels (example: m2)
- Moving Labels After Placement
- Labeling Trees and Shrubs with Different Styles
- Copying Plants & Labels
- Verify Labels & Make Corrections
- Labeling Plants or Concept Plants in External References (Xrefs)
- Using REDEFINEBLOCK to Repair Plant Labels
- Lining Up Plant Labels With Precision
- Updated Plant Labels (Added in 2019)
- Plant Labeling Theory
- Related Webinars
- Troubleshooting
Our plant labeling tools make calling out your project plants or Concept Plants quick and easy. Because they're placed as "smart" blocks that can "read" your plants, your plant labels will identify and count plants automatically. You can choose to label individual plants or label an entire group consisting of the same plant variety.
We updated our default plant labels in 2019, adding styles that use MLeaders and improving the block-based label styles. You may not have these updated label styles. To access these styles, you'll need to delete all existing default plant label blocks and slides. For instructions, see our Updated Plant Labels page.
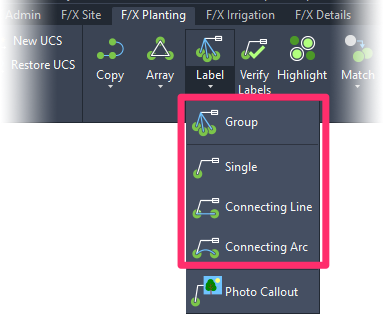
Plant Labeling Overview
We offer four possible methods of labeling plants:
- Label by Group
- Label a Single Plant
- Label by Connecting Line
- Label by Connecting Arc
To begin labeling plants, select one of these labeling tools, depending on your labeling preferences. You can then select the plants you want to label.
Note that each of the four labeling methods has slightly different instructions.
When placing plant labels, you can press the F8 and F9 keys to toggle between Ortho and Snap modes, respectively. This will allow you to lock your leaders at certain angles.
Label by Group
This labeling method allows you to call out several plants of the same variety at once. It's as easy as drawing a window around the plants you want to label.
You'll start by selecting the plant variety you want to label. The window will only recognize that variety, allowing you to label your plants extremely quickly.
Open the Label by Group tool:

F/X Planting ribbon, Group flyout
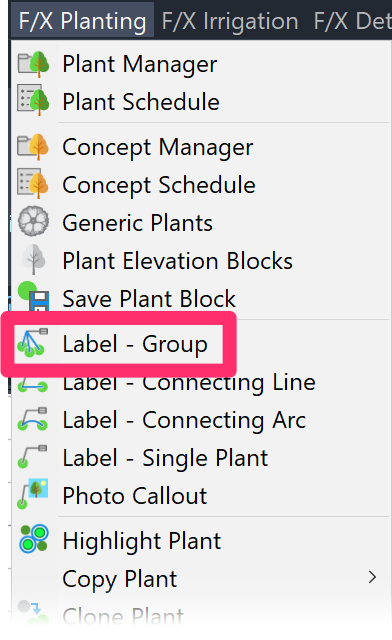
F/X Planting menu, Label - Group option
or type FX_PlantLabelGroup in the Command line
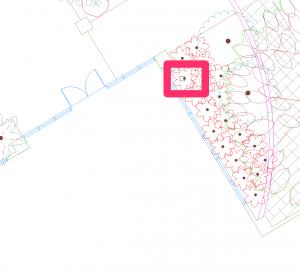
When you select Label by Group, the cursor will turn into a pickbox.
Click a plant in the group you want to label.
Labeling a groundcover or Shrub Area? Press G on your keyboard before selecting the planting area. The Group Label tool won't recognize planting hatches unless you press G first.
You can also right-click at this point to switch to the Label Single Plant tool.
The plant you select will determine the plant type that will receive the label. A leader line will be drawn from this plant – take care to select the correct plant.
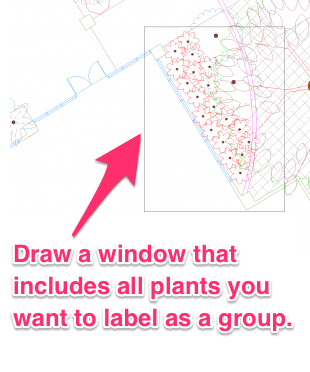
Next, create a window around the area where you want this plant type to be counted.
Only the selected type of plant will be counted, so you don't need to worry about which other plants the window includes.
Want more control over the exact plants you select? The Label by Group tool also includes the option to select plants with a custom closed polyline rather than a simple box.
When the Group tool is active, you'll see a [Polygon] option in the Command line. If you type P and then press Enter, you can draw exactly where you want the tool to look. If you already have a polyline drawn around a set of plants, choose the Polygon option, then the [S]elect option. You'll then be able to pick that existing polyline as the boundary and your label will read in those plants respectively.
Want to use the previous window or polygon you created using the Label by Group tool? Right-click for your first window point when drawing your next window. The tool will be applied to the previous window or polygon.
A leader will originate from the first plant you selected.
Block labels (pictured): If you're using one of our block-based label styles, a preview of a plant label will appear at the cursor crosshairs.
MLeader labels: If you're using one of our MLeader label styles, you won't see a preview of the callout box – instead, you'll see a dashed yellow line. More information
Move the mouse to the location where you want to place the label.
If using an MLeader label style, click in the center of the area where you want the label to appear. For block label styles, click at the edge of where you want the label. You can always move your labels after placing them.

After placing the label, you can either press Esc or right-click to turn off plant labeling.
If you want, you can also select another plant to help define the plants you're labeling.
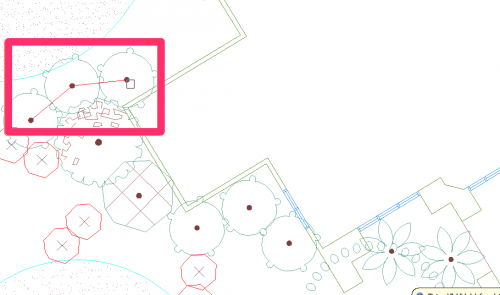
You can choose to label your plants by Group using only one leader, or using more than one leader (see images below).

Labeling by Group with only one leader

Labeling by Group with more than one leader
Notes on labeling plants by group:
- You can adjust the plant selection of a label by Group after you've placed a label. After labeling, select Label by Group again. Then click the label – not the plants. Now draw a new window around a revised area. Those plants will be identified on the label.
-
Label by Group can label a maximum number of 1,800 plants at a time in a single group. If you attempt to label a group that exceeds 1,800 plants, you'll get an Error extending data message. Rather than labeling groups this large of individual trees or shrubs, we recommend either:
- Adding your shrubs as Shrub Area or groundcovers, placing them as hatches, and using our other labeling tools to label the hatches (Single Plant for one planting area, or Connecting Line or Connecting Arc for several hatches at a time), or
- Relying on the Plant Schedule to calculate your totals, labeling single plants here and there for identification
- Label by Group also acts like an editing tool for your existing plant labels. You can move labels around like you would a Multileader, or add newly placed plants to an existing callout. Just open Label by Group and make your edits.
- Using Label by Group with MLeader label styles? You can easily add and remove leaders as needed.
Close
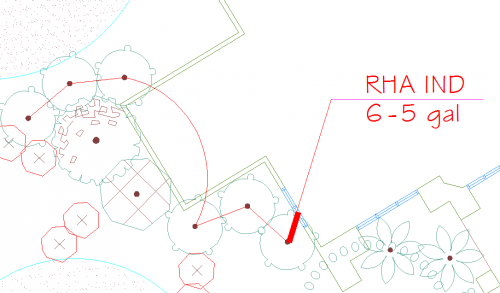
Label a Single Plant / Shrub Area / Groundcover
Use this labeling method to call out a single tree, shrub, Shrub Area, or groundcover.
Access the Label – Single Plant tool:

F/X Planting ribbon, Single flyout

F/X Planting menu, Label - Group option
or type FX_PlantLabelSingle in the Command line
When you select Label – Single Plant, the cursor will turn into a pickbox.
Click the plant you want to label.
Click again to immediately place the label.
Block labels (pictured): If you're using one of our block-based label styles, a preview of a plant label will appear at the cursor crosshairs when you are about to place the label.
MLeader labels: If you're using one of our MLeader label styles, you won't see a preview of the callout box – instead, you'll see a dashed yellow line. More information
If using an MLeader label style, click in the center of the area where you want the label to appear. For block label styles, click at the edge of where you want the label. You can always move your labels after placing them.
You can also use Label – Single Plant to label a Shrub Area or groundcover.
Select Label – Single Plant, then use the pickbox to click within the Shrub Area or groundcover.
The label will be placed where you clicked.
When you add a plant as a Shrub Area or groundcover, you have the choice whether your plant labels will show plant quantities or square footage. More information
If you use Shrub Areas, it's a good idea to label each one. Labeling groundcover areas is optional, and many clients prefer to let the groundcover hatch speak for itself while letting the plant schedule indicate the total quantity or area of groundcover.
If you want to connect and label several Shrub Areas or groundcover areas, you can use our Label by Connecting Arc or Label by Connecting Line tools.
Close
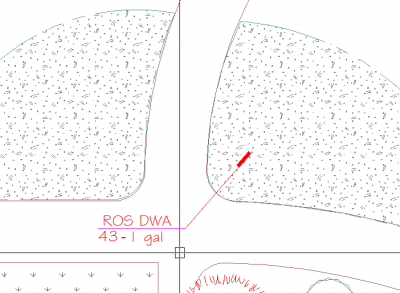
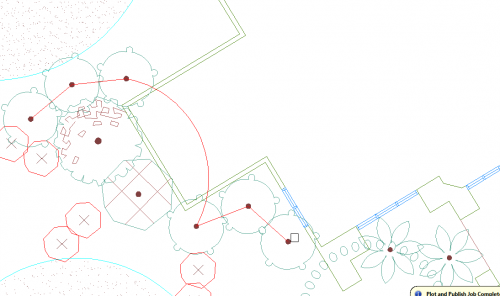
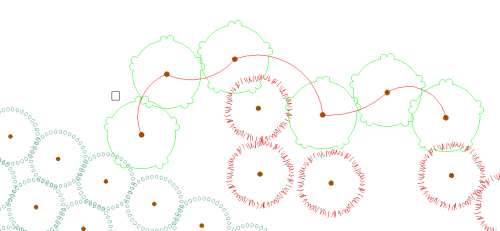
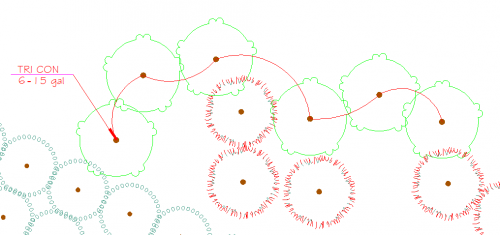
Label by Connecting Line
The Label by Connecting Line tool calls out a group of plants of the same variety, connecting the plants with lines and, if you want, arcs. You can also use this tool to label several hatches depicting groundcovers or Shrub Areas.
Access the Label by Connecting Line tool:
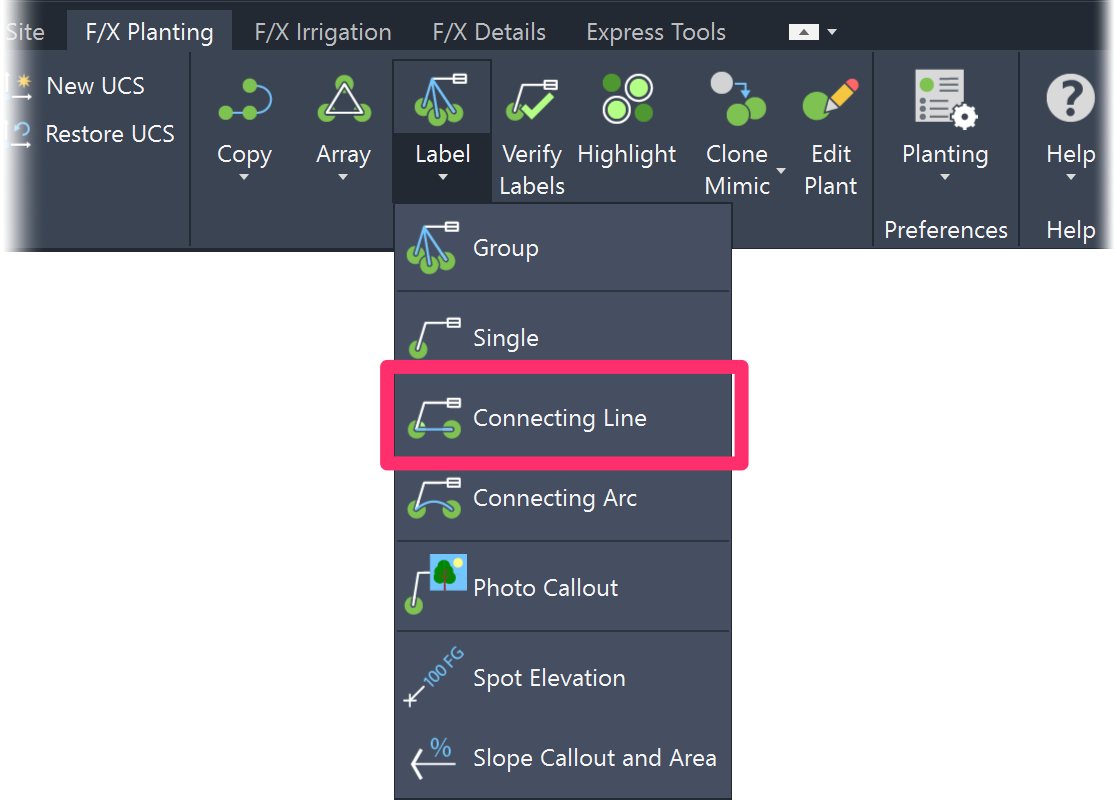
F/X Planting ribbon, Connecting Line flyout
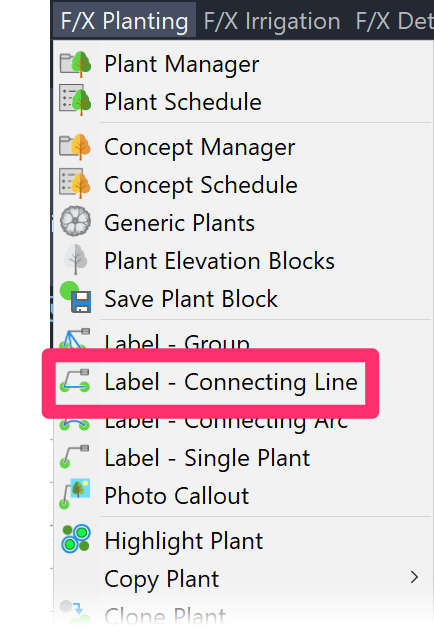
F/X Planting menu, Label - Connecting Line option
or type FX_PlantLabelLine in the Command line
When you select Label by Connecting Line, the cursor will turn into a pickbox.
Select a plant to attach to the first connecting line.
Labeling a groundcover or Shrub Area? Press G on your keyboard before selecting the planting area. The Label by Connecting Line tool won't recognize planting hatches unless you press G first.
Now click anywhere on another plant of the same type. A line will connect the two plants, and the Command line will prompt you to Select next plant or<A>rc.
Are you seeing a Not the same plant message when clearly selecting the symbol of the same plant? Connecting Line and Connecting Arc labels pick the selected plant by recognizing the closest plant block insertion point to the point clicked. The tool is not looking for the linework of the symbol at all. So when choosing the next plant, aim for the trunk or insertion point instead of the outer edge of the symbol, even if another plant's outer edge is overlapping the trunk. That way, the tool will select the correct plant.
Select more plants of the same type to connect them.
At any time, you can type A to place an arc. The Command line will prompt you to Select next plant.
Select the next plant as requested. The Command Line will prompt: Arc midpoint.
Click to set the arc midpoint.

The arc will be created.
The label method will then default back to Label by Connecting Line.
Select more plants if you want.
When finished, right-click to turn labeling off and place the label.
Block labels (pictured): If you're using one of our block-based label styles, a preview of a plant label will appear at the cursor crosshairs when you're about to place the label.
MLeader labels: If you're using one of our MLeader label styles, you won't see a preview of the callout box – instead, you'll see a dashed yellow line. More information
If using an MLeader label style, click in the center of the area where you want the label to appear. For block label styles, click at the edge of where you want the label. You can always move your labels after placing them.
You can also use Label by Connecting Line to call out several hatches representing Shrub Areas or groundcovers. Those labels will show plant quantities or square footage, depending on how you've configured each plant in your project. More information
Close
Label by Connecting Arc
The Label by Connecting Arc tool calls out a group of plants of the same variety, connecting the plants with arcs. You can also use this tool to call out several hatches representing groundcovers or Shrub Areas.
Access the Label by Connecting Arc tool:

F/X Planting ribbon, Connecting Arc flyout

F/X Planting menu, Label - Connecting Arc option
or type FX_PlantLabelArc in the Command line
When you select Label by Connecting Arc, the cursor will turn into a pickbox.
Select a plant to attach to the first connecting arc.
Labeling a groundcover or Shrub Area? Press G on your keyboard before selecting the planting area. The Label by Connecting Arc tool won't recognize planting hatches unless you press G first.
When you click the first plant, the Command line will prompt you to Select next plant.
Click anywhere on the next plant you want to label.
Are you seeing a Not the same plant message when clearly selecting the symbol of the same plant? Connecting Arc and Connecting Line labels pick the selected plant by recognizing the closest plant block insertion point to the point clicked. The tool is not looking for the linework of the symbol at all. So when choosing the next plant, aim for the trunk or insertion point instead of the outer edge of the symbol, even if another plant's outer edge is overlapping the trunk. That way, the tool will select the correct plant.
The Command Line will prompt: Arc midpoint.
Click to set the arc midpoint.
When you click to select a midpoint, the arc will be drawn between the two plants. Continue the process for the rest of the plants you wish to label in this way.
You can also press the L key on your keyboard to toggle to the Label by Connecting Line tool.
When finished, right-click to turn off labeling and place the label.
Block labels (pictured): If you're using one of our block-based label styles, a preview of a plant label will appear at the cursor crosshairs when you're about to place the label.
MLeader labels: If you're using one of our MLeader label styles, you won't see a preview of the callout box – instead, you'll see a dashed yellow line. More information
If using an MLeader label style, click in the center of the area where you want the label to appear. For block label styles, click at the edge of where you want the label. You can always move your labels after placing them.
You can also use Label by Connecting Arc to call out several hatches representing Shrub Areas or groundcovers. Those labels will show plant quantities or square footage, depending on how you've configured each plant in your project. More information
Close
Labeling Groundcover and Shrub Area Hatches
Labeling Planting Hatches With the Group, Connecting Line, and Connecting Arc Tools
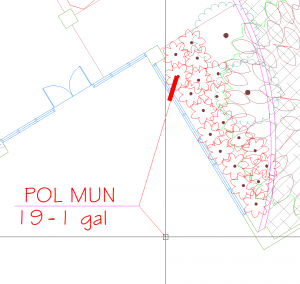
If you want to label a groundcover or Shrub Area using the Group, Connecting Line, or Connecting Arc tool, you'll need to press G on your keyboard before selecting the planting area. These tools won't recognize planting hatches unless you press G first.
The Single Plant tool does not require you to press G before selecting a planting area.
Plant Quantity vs. Hatch Area
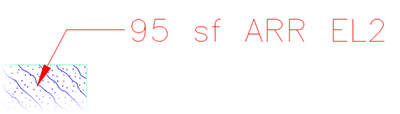
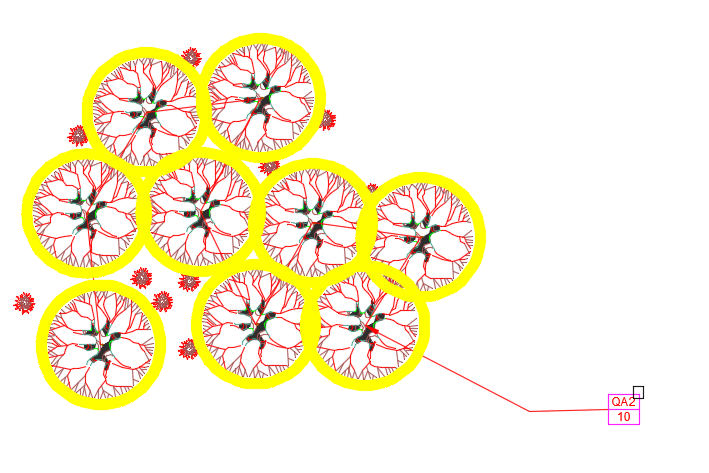
When you add a plant as a groundcover or Shrub Area, you have a choice to label the area (in square feet, meters, etc.) of each hatch representing that plant, or the number of plants in each of the hatches. You can use our Label Single Plant tool to label a single planting area, or either Label by Connecting Line or Label by Connecting Arc to call out several planting areas. (The Label by Group tool is only designed to work with plants you've added as Trees or Shrubs.)
When adding or editing a plant, you can choose to include a Plant spacing value, as in the examples below.

If you choose to include a Plant spacing value for a plant, the system will automatically calculate quantities of that plant based on the spacing you provide. In our example, we've placed a spacing value of 12 inches for a plant we've added as a groundcover. As a result, that plant will be calculated as a quantity in each groundcover area, based on plants spaced 12 inches apart.
When you call out a hatch representing that plant, the label will reflect that quantities, as pictured below.


If you leave the Plant spacing field blank, the plant will be calculated by area based on the measurement system you're using in your Preference Set.
The resulting label will reflect that area in square feet, meters, etc. The example below shows a label that calculates a plant in square feet (sf).
Our Updated Label Styles, Including MLeaders
Quick video
Due to popular demand, we updated our plant label styles in March 2019. The updated label styles include new and improved block-based label styles, as well as a whole new set of label styles that incorporate Multileaders (MLeaders).
See our updated plant label styles page for more information, including instructions on how to get these updated label styles.
How Our MLeader Label Styles Work
Our MLeader label styles work exactly the same as our block label styles with all four of our labeling tools, with the following exceptions:
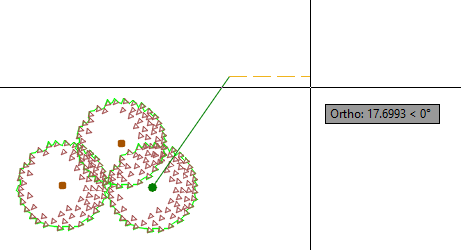
- When placing an MLeader label, you won't see a preview of the callout box when placing the label. Instead, you'll see a dashed yellow line showing you which direction the callout box will extend from the leader.
- When you click to place an MLeader label, click in the center of the area where you want the label to appear.
- MLeader labels are much easier to move than our block label styles. If you want to move MLeader labels after placing them, follow our instructions for moving MLeader labels.
- It's also easy to add leaders to our MLeader labels, as well as remove leaders.
- Similarly, you can easily align MLeader labels to each other.
Due to the limitations of MLeaders, you won't be able to change the style of an MLeader label once it's been placed. Instead, you would need to delete the label, change the style, and then place it again. To be safe, ensure that you're using your desired label style when you first place your MLeaders.
Labeling Concept Plants
Our plant labeling tools now work on Concept Plants. When you're ready to label the plants in a concept plan, just use any of our plant labeling tools.
Plant/Concept Plant Labels and Slope Areas
Slope Areas work with our Slope Callout tool to apply a specific grade percentage or ratio to a closed polyline area in your drawing. Objects represented by any smart hatches within those closed polylines (Slope Areas) will have their quantity, volume, or area recalculated based on that slope percentage or ratio.
If you use any of our labeling tools to label plant or Concept Plant hatches in a drawing that includes one or more Slope Areas, the labeling tool will scan that hatch to determine to determine whether it's are inside a Slope Area. If so, the schedule will recalculate the square footage/meters of that area, along with any resulting changes in quantity. This applies to groundcover and Shrub Area hatches, as well as all Concept Plant hatches, including seed and grass mixes.
Group labels can potentially include plants in multiple areas within different slopes.
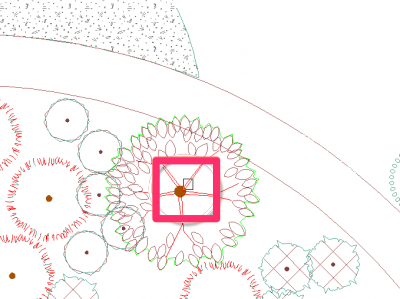
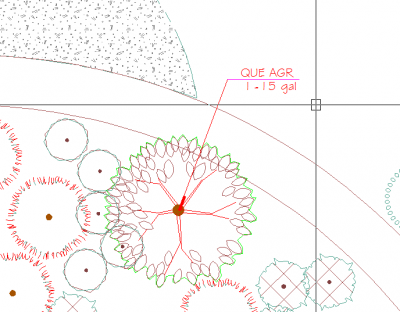
Locating Plants to Label Using the Highlight Plant Tool
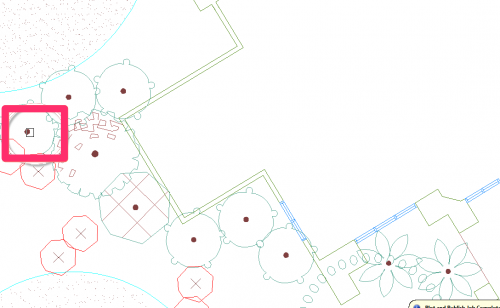
Need to find a plant before you've labeled it? Use our Highlight Plant tool. Clicking a plant with Highlight Plant active will highlight every plant of the same variety. It's a quick and easy way to take stock of where you've placed a given plant and determine which of our labeling methods you want to use to call it out.
You can also use Highlight Plant and click a label rather than a plant.
All plants attached to that label will be highlighted.
Plant Code Styles
Each plant you add to a Land F/X project will have its own unique plant code that will identify that plant by abbreviations of its genus and species in both your labels and Plant Schedules. You can choose to give this code three possible styles:
- GEN SPE (three capital letters for the genus and three capital letters for the species)
- Gen Spe (three letters for the genus and species, with initial caps and internal lowercase letters)
- GS (one capital letter for the genus and one for the species)
For instructions on how to customize this code style, see the Plant Code section of our Planting Preferences page.
Labeling Plants With Photo Callouts
You can also choose to label your plants using plant photos garnered from an online images search. Our Photo Callout tool automates this process, allowing you to find and place images of specific plants quickly.
For more information, including instructions, see our Photo Callout documentation.
Plant Label Scale
Quick video
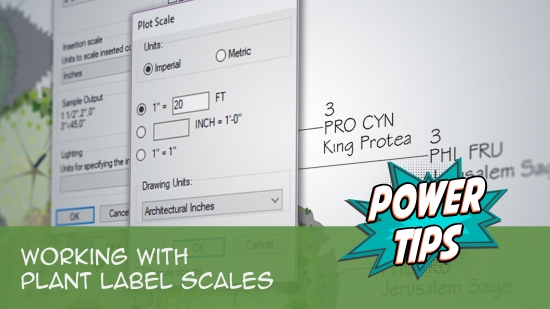
The scaling of your plant labels in relation to the rest of your drawing depends not only on the scale you've set, but also on the text size assigned to the PLANT CALLOUT font in the Text Manager.
A number of users have requested the ability to have plant labels come in slightly smaller or larger than the default, with a 10-point text height. We engineered this two-pronged scale factor for plant labels in direct response. Thus, rather than having to edit the label blocks to achieve this effect, you can simply edit the PLANT CALLOUT text style.
You may find that your plant labels are scaled incorrectly in relation to other objects in your drawing (such as your plants).
In this case, your first step should be to open the Text Manager and check the point size currently assigned to the PLANT CALLOUT text style.

Odds are, your labels are coming in at the incorrect scale because a user in your office changed the point size. If so, change the point size back to the normal size. Your plant labels should revert to the correct scale.
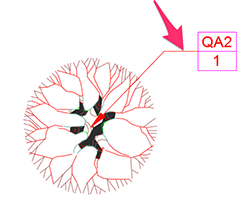
Extension Lines
The line that connects the leader of a plant label to the label itself is called an extension line (pictured to the right).
Our Planting Preferences screen includes an Extension Line section with the following options to set the length of this line:
- None: With this option selected, each of your labels will connect directly to its leader, with no extension line.
- Manual: This option allows you to set the length of each label's extension line manually, by clicking.
- Auto: Set a unit value (example: 0.25 inches) for each extension line. All labels will have an extension line with this uniform length.
For information and instructions, see our Extension Lines documentation.
Label in Paper Space
You can use any of our plant label options to place plant labels into Paper Space, and still perform all error checking as if they were placed in Model Space.
For further information and instructions, see our Label Plants in Paper Space page.

The example to the left shows a group of plants labeled in Paper Space, to the outside of a viewport.
Including Superscripts in Your Plant Labels (example: m2)
Do you want to include superscripts in your plant labels – for example, m2 instead of sq.m.? Note that not all SHX fonts allow for superscripts, so the system checks whether your chosen font is SHX or Windows TrueType Font (TTF), and displays as m^2 or sq.m. accordingly. To allow for superscripts, assign a TTF font to the Plant Callout Text Style when selecting a font.
Moving Labels After Placement
Landscape designers commonly find themselves having to move labels after they've placed them. For instructions, see our Moving Plant Labels article.
Labeling Trees and Shrubs with Different Styles
Need to label your trees and shrubs with different callout styles? If so, you'll need to have separate DWG files for your tree and shrub plans. See our instructions for labeling trees and shrubs with different callout styles.
Copying Plants & Labels
It's possible to copy and paste plants and their labels around a drawing without the plants losing their association with their labels. You can do so using the COPYCLIP command on both the plant and the label together. For more information, see our article on copying plants and labels.
It's important that you use the COPYCLIP command on both the plant and label together. If you copy them separately, they will lose their association. Do not use the COPY command to copy plants and labels.
Verify Labels & Make Corrections
To ensure that your labeling is correct, use our Verify Labels tool. For information on how to use this critically important tool, see our Verify Labels page.
Did you make changes to your planting plan by adding, deleting or replacing plants? If so, you'll need to update your plant labels to reflect the revised plant counts.
Labeling Plants or Concept Plants in External References (Xrefs)
You can label plants and Concept Plants in Xrefs from your main drawing using the Edit Reference In-Place tool. Here's how.
Using REDEFINEBLOCK to Repair Plant Labels
Plant labels can sometimes behave somewhat strangely. Examples include:
- You placed a plant label, and the callout box contains no information or text – it's empty.
- The right and left sides of the same callout style are coming in at different sizes.
- The layer colors are wrong.
This list is not exhaustive; it's just a sample of some common label/callout-related issues our users have faced, which can often be resolved by a simple step.
Remember: Callouts are just blocks, each of which is contained in its own .dwg source file. Problems can sometimes occur with these blocks that cause them to behave strangely in a drawing.
If any of your labels or callouts seems out of order, the first and easiest step to take is to redefine the block from the source file using the REDEFINEBLOCK command. For more information, visit our Redefine Block documentation.
Lining Up Plant Labels With Precision
If you need to line up your plant labels, you can enable a grid in your drawing and then snap to points on that grid when placing your labels. For instructions, see our Line Up Plant Labels With Precision page.
Updated Plant Labels (Added in 2019)
We updated our default plant labels in March 2019, adding styles that use MLeaders and improving the block-based label styles. You may not have these updated label styles. To access these styles, you'll need to delete all existing default plant label blocks and slides. For instructions, see our Updated Plant Labels documentation.
Plant Labeling Theory
Labeling is a construction communication tool. One argument against labeling your plans holds that you don't need to label planting plans – you just need to let the plants have unique symbols and have the schedule reflect the plant quantity accurately. This extremely weak argument is generally based upon having to label plants manually, which presents a high potential for error, and just giving up and leaving it up to the contractor.
It's easy to see that labeling a plan accurately will mean a more precise installation, making the installation and construction review easier, and reducing the potential for liability and ill feelings with the site owner. The best possible time to label a plan is the design phase, before you go out to bid. The best way to label is to use an automated system like ours.
As far as the look of the label goes, our Planting Preferences screen offers a variety of options. See our Planting Preferences page for more information.
- Make the labeling functional by thinking like the installer. Have enough labels throughout the plan to express how many plants go in one specific area or another.
- If a plan has a lot of labels, the labels themselves should be as physically small and efficient as possible. You simply may not have enough room to put in exotic or lengthy labels.
- Speed is often of the essence in an office situation. Therefore, your ability to space or line up labels evenly may depend on how much time you are able to spend on the look of the plan. Labeling is, after all, a functional communication of construction components.
Related Webinars
- Getting Started with Planting F/X: We'll give you a full tour of our F/X Planting ribbon, covering everything from adding, placing, and labeling plants to error checking, scheduling, and turning on our quick render tools. (1 hr)
- Migrate an Existing Plan into Land F/X: Do you plan to make the switch to Land F/X and have an AutoCAD plan you need to convert? Watch how quickly you can transform your dumb CAD plan into a smart Land F/X plan, including the labeling process. (54 min)
Troubleshooting
Issue: You want to remove the "SF" or "Sq.M." tag from a plant label
Issue: After I edit plants, the plant labels do not update
Issue: Plant labels are not showing up in Paper Space, or plant label text is missing
Issue: Plant labels are losing their association (connection) with plants
Issue: Your plant labels are scaled incorrectly, and you need to correct their scale
Issue: A small yellow box with an exclamation mark appears on plants after I label them
Issue: A groundcover label only says "SF" or "Sq.M." and does not show the quantity or area
Issue: Right and left plant labels are showing different information
Issue: A plant label is too big or too small
Issue: You want to use numbers, rather than genus/species, as a code to label plants
Issue: You want to change your plant labels to show common names rather than botanical names
Issue: Plant labels are acting strangely, such as:
- You placed a plant label, and the callout box contains no information or text – it's empty.
- The right and left sides of the same callout style are coming in at different sizes.
- The layer colors are wrong.
Issue: You want to label in different scales in one drawing
Issue: When you place plant labels, they zoom out and rotate
Issue: Your plant labels disappear when you change your Viewport Scale
Issue: Rescale plant labels after you've already set the drawing scale
Issue: Plant labels draw order keeps changing
Issue: "Not a Plant" error message when attempting to place a plant label
Issue: Empty leader, but no callout, when attempting to place a plant label
Issue: Some of your plant labels are not resizing (rescaling) when you rescale your drawing
Issue: You are experiencing a significant delay when attempting to add or place plant labels
Issue: Plant labels are coming in blank or empty
Issue: "Missing File" error message when placing plant labels
Issue: Plant labels are rescaling immediately (to the incorrect size) when placed in Paper Space
Issue: Some of your plant labels are coming in away from plants and/or not appearing correctly. Examples include:
-
Labels appearing in the wrong location
-
Leader lines not pointing to the correct plants
-
Arrows pointing in the wrong direction, distorted, or missing
Issue: Different plant labels are coming in with different fonts or text styles
Issue: Your plant labels are not coming in at all
Issue: Text boxes are appearing around your label text when you plot your drawing to PDF
Issue: Plant labels are appearing behind hatches or other objects when placed in Paper Space
Issue: You want to have multiple designers label in one drawing at the same time
Issue: Text boxes are displaying in your drawing where your plant labels should be
Issue: Error adding extended data
Issue: Your plant label text is not showing up (but your labels are)
Issue: You are experiencing text wrapping issues with multileader (MLeader) plant labels
Issue: You want to create asymmetrical multileader (MLeader) plant labels
Issue: Convert old planting plan to use multileader (MLeader) plant labels
Issue: You want to convert a non-MLeader plant label style (aka a block style) to MLeader style
Issue: Your plant label arrows are hollow, not solid, or displaying as lines only
Issue: You received an Invalid Input error when attempting to place a plant or Concept Plant label
Issue: One or more plant label leader lines are pointing to 0,0 after you edited a plant or Concept Plant
Issue: Your block-based plant labels are showing up with transparency when placed in your drawing