
Verify Labels
Updated on: August 27, 2025
Quick video
- Verify Labels Overview
- Correcting Data Errors
- Verify Labels and Slope Areas
- Updating Plant Counts or Quantities in Labels
- Verify Labels and Concept Plants
- Related Webinars
- Troubleshooting
Once you've labeled your plants, we highly recommend running our Verify Labels tool. With a single click, Verify Labels checks your plant labels to verify that you've called out each plant in your drawing correctly.
Verify Labels Overview
Open the Verify Labels tool:
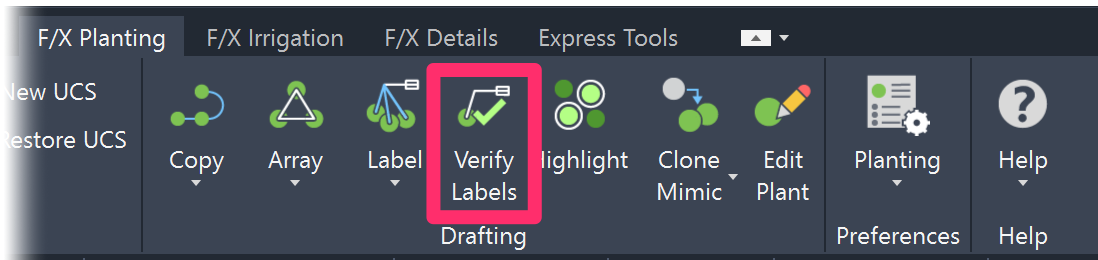
F/X Planting ribbon, Verify Labels button
or type FX_Verify_Plant_Labels in the Command line
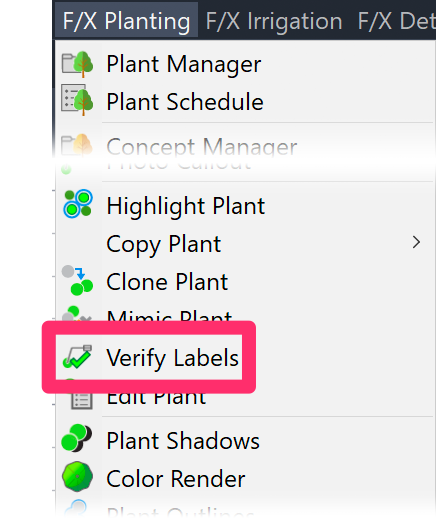
F/X Planting menu, Verify Labels option
Verify Plant Labels will scan your drawing for errors.
Two basic types of labeling errors can occur:
- Unlabeled plants: Plants with no label referencing them (including plants that have become disassociated from their labels or have never been labeled at all)
- Plants labeled more than once: Plants that have been accidentally connected to more than one label

If your drawing contains no labeling errors, you'll receive a message that all plants are labeled correctly.
If the drawing contains errors, you'll see a message describing the error(s).
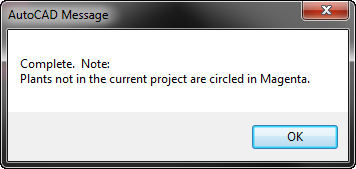
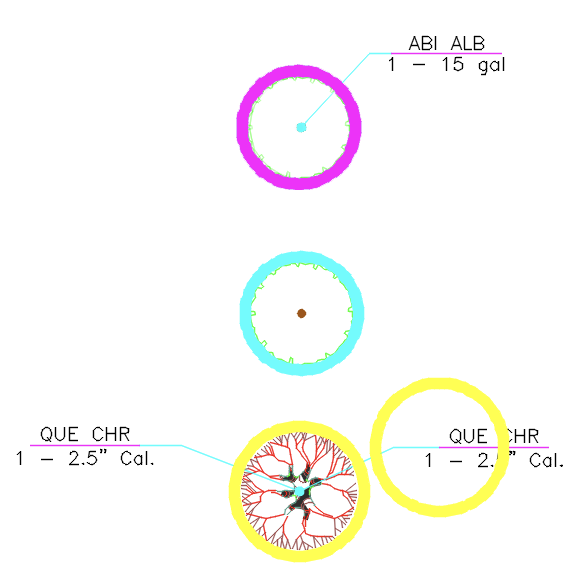
Any errors will be highlighted in your drawing in the following colors, depending on the error:
- Plants that have become disassociated with the current project will be highlighted in magenta.
- Plants labeled more than once will be highlighted in yellow.
- Unlabeled plants in your drawing will be highlighted in cyan.
You can now correct any errors. Here's how:
- Plants labeled in cyan: Use our Plant Labeling tools to label these plants.
- Plants labeled in yellow: Each of these plants will have multiple labels pointing to it. Delete the extra labels until each plant is only labeled once.
- Plants labeled in magenta: Follow the Correcting Data Errors steps below.
Once you've made the necessary corrections, select Verify Labels again.
Repeat these steps until you receive a message that all plants are labeled correctly.
- Verify Labels is a “must use” to ensure all of the labeling is correct. Never leave any project, no matter how small, without running this feature.
- On a large project, you might run this function after labeling a portion of the site, just to ensure that this portion is correct before moving to another area. If you do so, you may wish to use Work Areas to define with a border around an area. When you use work areas, you can perform error checking solely within a single work area. You can also create a work area to limit the error checking to that area. When finished, you can simply delete the work area.
- If you make any adjustments to the planting after you have labeled the plan, such as erasing some of the plants, the labels will update for the new quantities when you perform the Verify Labels function again.
Verify Labels is intended to verify the labels you've already placed, rather than the labels you plan to place. For example, if you haven't labeled any of your trees yet, Verify Label will not highlight unlabeled trees. Once you've started labeling your trees, Verify Labels will start error checking your tree labels. To locate all instances of a certain plant in your drawing, use our Highlight Plant tool.
Correcting Data Errors
If you encounter a data mismatch when using Verify Labels, you can correct it using our Edit Plant tool:
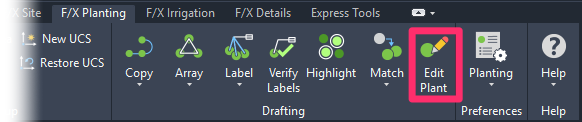
F/X Planting ribbon, Edit Plant button
or type FX_PlantInfo in the Command line

F/X Planting menu, Edit Plant option
The cursor will turn into a pickbox. Click one of the highlighted plants.
If the plant you selected is included in your project, the Plant Info dialog box will open, and you'll see all data associated with that plant.
Verify the plant's information. A subtle change may have occurred, such as a minor change in the size of the plant's symbol or container size. Click OK to accept this data information.

Now run Verify Labels again. The first plant you edited should not be highlighted anymore.
However, other plants of a different type may be highlighted if they had mismatched data. If so, repeat the process by using Edit Plant/Block Data and selecting one of the highlighted plants.
If the plant you selected is not included in the current project's plant data, you can select a plant from the list that is in the data, or add the plant to your project.
You may be discouraged if several hundred plants are highlighted when you use the Verify Labels function. Do not be deterred. It's possible that only a couple of plants had mismatched data, but those plants were used hundreds of times in the drawing. You only need to use the Edit Plant button once on each type of plant to correct the situation.
Verify Labels and Slope Areas
Slope Areas work with our Slope Callout tool to apply a specific grade percentage or ratio to a closed polyline area in your drawing. Objects represented by any smart hatches within those closed polylines (Slope Areas) will have their quantity, volume, or area recalculated based on that slope percentage or ratio.
If you run Verify Labels in a drawing that includes one or more Slope Areas, the schedule will scan all groundcover and Shrub Area hatches to determine whether they are inside a Slope Area. If so, the tool will change the plant quantity calculation of those areas to include slope factor, which may change an existing label if the Slope Area has changed or was added after the label was placed.
Updating Plant Counts or Quantities in Plant Labels
If you've made changes to a planting plan after labeling, run the Verify Labels tool to correct the plant counts in your labels automatically. You'll then most likely need to adjust any leaders, or connecting lines or arcs, that are still pointing to the wrong plant. You can carry out this process by following our steps to update plant counts in labels.
Related Webinars
- Getting Started with the Planting Tools: This webinar shows how to label plants in Model Space and Paper Space, as well as using the Verify Labels tool to error check your plan. (1 hr 3 min)
Verify Labels and Concept Plants
If you run Verify Labels on a drawing that includes Concept Plants and none of those Concept Plants are labeled, the tool will not highlight them as unlabeled.
Troubleshooting
Question: How do I remove the "SF" Tag from the quantity (Qty) callout?
Issue: After I edit plants, the callouts do not update
Issue: Plant labels are not showing in Paper Space, or text missing
Issue: Plant labels disappear or become invisible after you run Verify Labels
Issue: Error: 'bad argument type: stringp nil' when running Verify Labels
Issue: Lines in Model Space are appearing extra thick when using Verify Labels