
Plant Schedules: Examples
Updated on: February 15, 2024
Quick video

- Example 1: Various Options
- Example 2: Remarks in Separate Column, Space Between Plants, Quantity Before Name
- Example 3: Schedule Placed as a Table
- Example 4: No Plant Quantities in the Schedule
- Example 5: Symbols at Plan Size
- Example 6: Mix of Plant Codes and Symbols in the Schedule
- Example 7: Exclude Some Plant Categories
- Example 8: Plants Identified by Botanical Name Followed by Common Name
- Example 9: Plants Identified by Botanical Over Common Name
- Example 10: Plants Identified by Botanical Name
- Example 11: Plants Identified by Common Name
- Example 12: Include Plant Cost
- Related Webinars
Quick video

We offer a variety of options for creating and placing a Plant Schedule. You can include or exclude everything from your plant symbols and codes to cost estimates, spacing, plants in Xrefs, and much more. Read on to see several Plant Schedule examples generated with different options selected in the Plant Schedule dialog box.
For information on how to generate a Plant Schedule using these options, see our Plant Schedules: Getting Started documentation.
Example 1: Various Options
In this example, we've set several options in the Plant Schedule dialog box.

1. Destination: The options for Table and Gridlines non-plot are selected.
2. The plant names will be listed as Botanical/Common.
3. Remarks: The option for Below Name is selected.
4. The 1 option is selected from the Space between Plants menu.
5. Code is selected to represent the Trees and Shrubs.
6. Symbol is selected to represent the Shrub Areas and Groundcovers.
7. The Size box is checked for all four plant categories.
8. The Quantity box is checked for all four plant categories.
The resulting schedule:

Example 2: Remarks in Separate Column, Space Between Plants, Quantity Before Name
In this example, the same options were set in the Plant Schedule dialog box as in Example 1, with the following exceptions:

1. Remarks: The option to place the remarks in a separate Column is selected.
2. The 0 option is selected from the Space between Plants menu.
The resulting schedule:
Example 3: Schedule Placed as a Table

In this example, the Drawing option is selected under Destination, and the Gridlines non-plot option is unchecked.
As a result, the Plant Schedule will be placed in the drawing with gridlines set to plot, so it will plot as a table.
The resulting schedule, in table format:

Example 4: No Plant Quantities in the Schedule

1. The Destination is set to Drawing with Gridlines non-plot checked.
2. Trees and Shrubs will be represented by a Symbol.
3. The Quantity box is unchecked for all four plant categories (meaning that the quantity of plants will not appear in the Plant Schedule for any of the four categories).
The resulting schedule:

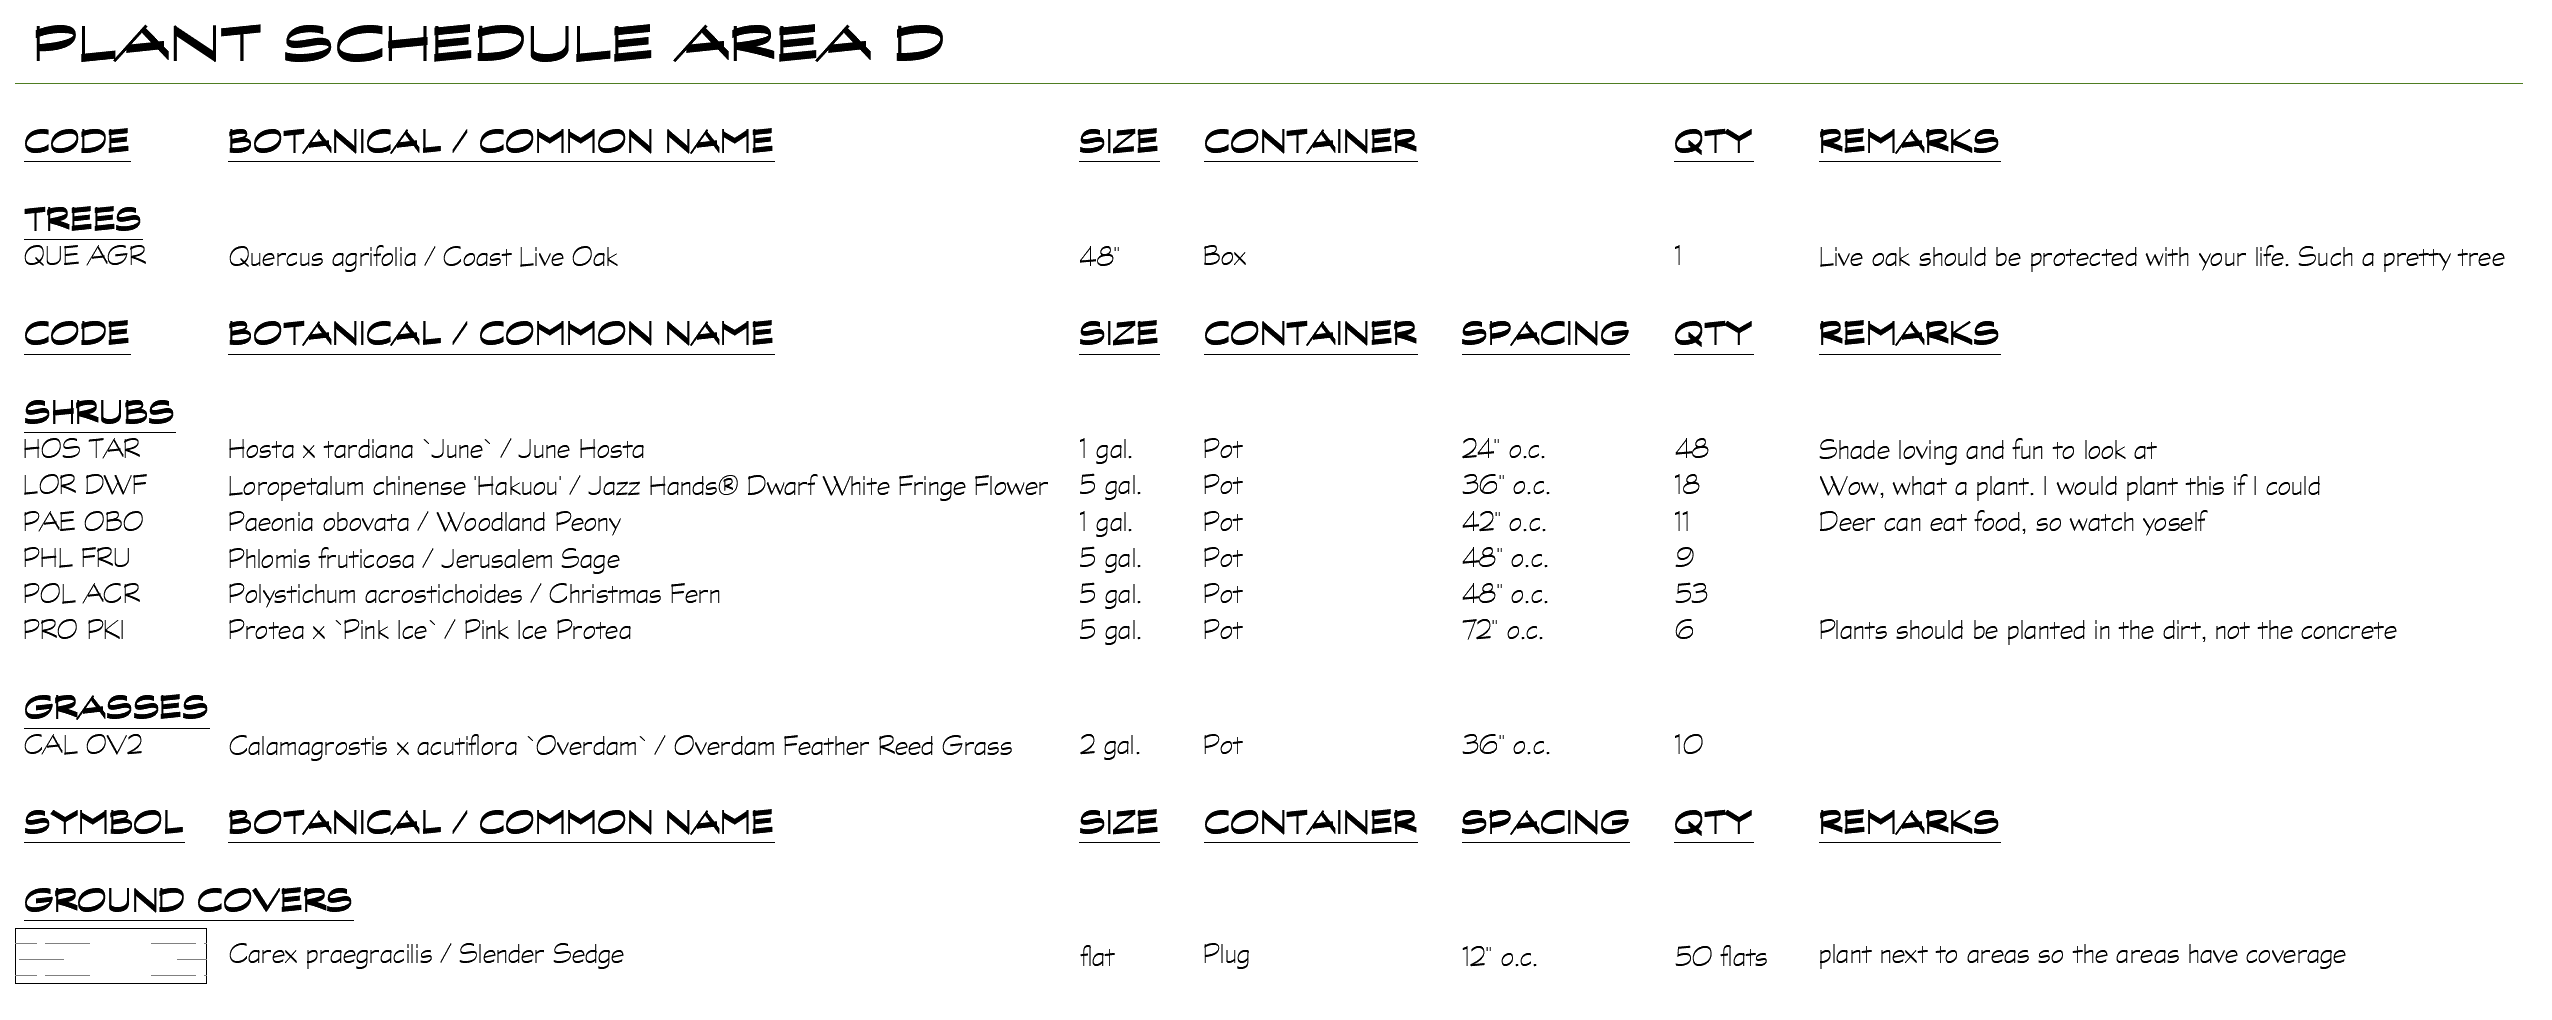
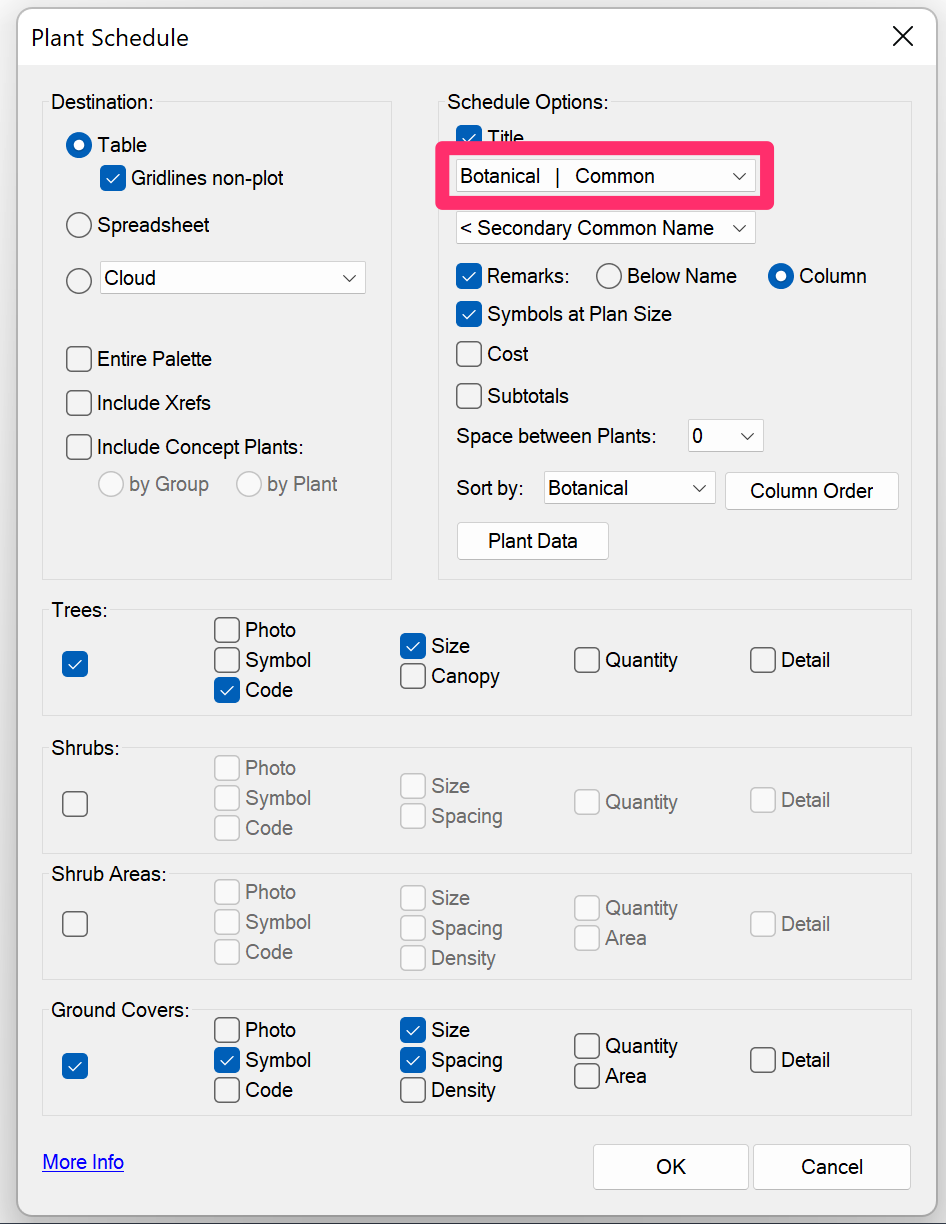
Example 5: Symbols at Plan Size

This example has the same settings as Example 4, except the Symbols at Plan Size box is checked.
As a result, the plant symbols in the schedule will be the same sizes as they appear in the drawing itself
The resulting schedule:

Example 6: Mix of Plant Codes and Symbols in the Schedule

This example shows a mix and match of plant representation for a firm with the following standards for the appearance of the Plant Schedule:
- Trees and groundcovers will be represented by a Symbol.
- Shrubs and Shrub Areas will be represented by a Code.
The resulting schedule:

Example 7: Exclude Some Plant Categories
You may want to represent only the trees and the groundcovers on one plan (perhaps by freezing the layers for shrubs and shrub labels), and represent only shrubs and Shrub Areas on another plan (perhaps by freezing the layers for trees and groundcovers and their labels). In this case, you may you want your Plant Schedules to reflect those alterations. You can turn specific plant categories on or off to see certain items, as in the following example, which only calls for trees and groundcovers to show up in the schedule.

1. The Trees category is checked, and trees are represented by their Code.
2. The Shrubs and Shrub Areas categories are both unchecked.
3. The Ground Covers category is checked, and groundcovers are represented by their Symbol. (For groundcovers and Shrub Areas, the schedule symbol will be the hatch that represents the plant in the drawing.)
The resulting schedule:

Example 8: Plants Identified by Botanical Name Followed by Common Name

In this example, we've selected the Botanical | Common option from the name order menu.
This menu also includes a Common | Botanical option, where the Common name column appears first.
In the resulting schedule, the Botanical and Common names are listed in separate columns, with the Botanical column appearing first.

Example 9: Plants Identified by Botanical Over Common Name
In this example, we've selected Botanical over Common for the name order.
This menu also includes a Common over Botanical option, where the Botanical name appears above the Common name.
In the resulting schedule, each plant's Botanical name will appear above the plant's Common name – that is, in the same column.

Example 10: Plants Identified by Botanical Name

In this example, we've selected the Botanical option, where the schedule includes only the Botanical name for each plant.
The resulting schedule:

Example 11: Plants Identified by Common Name

In this example, we've selected the Common option, where only the Common name for each plant appears in the schedule.
The resulting schedule:

Example 12: Include Plant Cost
Here's a schedule where we've selected the Cost option, which will create a column in the schedule that shows and adds up all costs of plants in the project.

The resulting schedule:

Related Webinars
- Ask Us Anything! Spotlight on Plant Schedules Join us for the first "Ask Us Anything," which focused on Plant Schedules, including the massive 2023 update that overhauled the Plant Schedule dialog box and opened new possibilities for your Plant Schedules. (1 hr 7 min)
- Plant Schedules: Land F/X provides a wide range of options for configuring a Plant Schedule for your landscape design. We’ll show you how to organize your columns and include or omit elements such as plant symbols, codes, cost estimates, spacing, and plants from your Xrefs. Join us to explore these choices and pick up valuable insights for crafting your ideal schedule. (1 hr 5 min)
- Planting F/X Setup: If you're trying to make Planting F/X work with your firm's existing style standards, this webinar is for you. (58 min)