
Reference Notes (RefNotes): Getting Started
Updated on: May 28, 2026
Quick video

- Reference Notes Manager Overview
- Adding Reference Notes
- Using Reference Notes to Spec Amenities from Manufacturers
- Reference Notes and the Railing Tool
- Assigning a Detail to a Reference Note
- User Fields and Values
- Leader and Callout Style Options
- Placing Reference Notes
- Highlighting RefNotes in Your Drawing
- Referencing Multiple Sheets in One Drawing
- RefNotes and MultiLeaders (MLeaders)
- Importing Reference Notes from a Template or Project
- Reference Notes Callouts and Schedules
- Reference Notes Preferences
- Adding Color to RefNote Hatches
- Electrical Symbols
- Having a Hatch Issue? Download Our Updated Hatch Patterns Manually
- Related Webinars
- Troubleshooting
Want to place a site object or hatch? Try using Reference Notes. Our Reference Notes (RefNotes) tool allows you to place site amenities, mulches, and any other site object you can think of – while also assigning data such as cost by unit, area, length, or volume.
Did you know you can quickly convert generic blocks (graphics) in your drawings directly into RefNotes with data, costs, etc.? Find out how!
Reference Notes Manager Overview
Open the Reference Notes (RefNotes) Manager:

F/X Site ribbon, RefNotes flyout
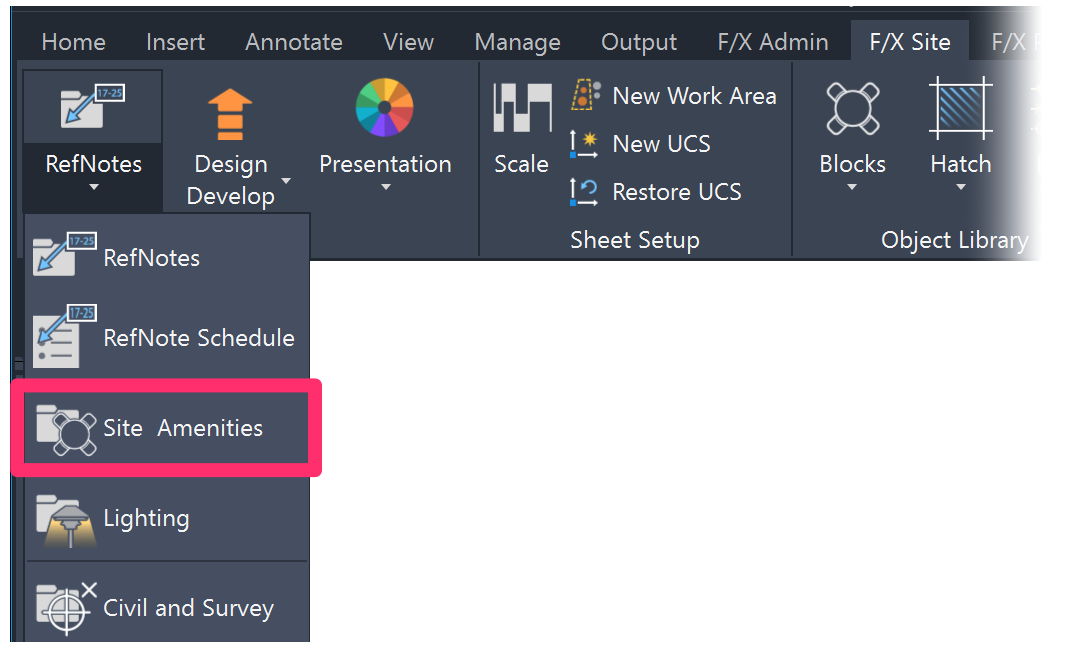
F/X Site ribbon, Site Amenities flyout

F/X Details ribbon, RefNotes flyout

F/X Site menu
Or use one of the following keyboard commands:
- RefNotes
- FX_Amenities
The Reference Notes Manager will open.

1. Select a RefNote type to filter the list to view only that type, or select All to view all types.
2. Use the Division menu to filter the list by RefNote Division Learn about RefNote organization and divisions.
3. Use this button to renumber your RefNotes.
4. Check this box to see your RefNotes in Grid View.
5. The list of RefNotes shows results from each filter individually, or results from both filters combined.
6. Buttons to create a New RefNote, Edit or Delete an existing RefNote, Import a RefNote from another project, and Highlight all instances of the selected RefNote in the drawing.
7. Buttons to Place a note, mark a note with a Callout, and place a Reference Note Schedule.
Quick video

Reference Note Types
We offer several types of Reference Notes, each of which has its own specific function in adding items and data to your drawing. To learn about the different Reference Note types, visit our documentation sections on:
- Notation Reference Notes: Place a numeric symbol referring to a text notation.
- Amenity (Object) Reference Notes: Place one or more site objects, and calculate quantities and costs automatically.
- Length Reference Notes: Place an item of linear quantity, and calculate data such as cost per foot.
- Area/Volume Reference Notes: Place a material such as a mulch in your drawing, represented as a hatch, and calculate data such as cost and square or cubic footage.
You can select a Reference Note Type in both the Reference Notes Manager and the New Reference Note dialog box, which opens when you go to add a new Reference Note.
Use the options at the top of the RefNotes Manager to filter the list of RefNotes that have been added to your project by type, or to see all added Reference Notes at once by selecting All.


When adding a new Reference Note to a project, you'll select the type of Reference Note to add. Note that Area and Volume Reference Notes are combined into one category in this dialog box.
Grid View
The Reference Notes Manager includes a Grid View option, pictured to the right.
Check the Grid View box to see your RefNotes in a grid format, with columns for the RefNote Code (number), Note (title of the RefNote, and Detail (the detail you've assigned to a RefNote, if applicable).
The text within each of these columns is editable, which allows you to edit your RefNotes on the fly.
Uncheck the Grid View box to return the Reference Notes Manager to standard mode (pictured above).

Adding Reference Notes
Before you can place a Reference Note in your drawing, you'll first need to add it to a Land F/X project.
To begin adding a Reference Note to a project, click the New button in the Reference Notes Manager.


Select a Reference Note Type at the top of the New Reference Note dialog box.
Because each Reference Note type has its own set of data, this dialog box will have different options depending on the Reference Note type you selected. Pictured above are the options available for Notation Reference Notes.
For instructions on adding a specific Reference Note type, visit our documentation sections on:
- Adding a Notation Reference Note
- Adding an Amenity (Object) Reference Note
- Adding a Length Reference Note
- Adding an Area/Volume Reference Note
Adding a Note
The Note field, available for all Reference Note types, is the most commonly used portion of the New Reference Note dialog box.

At its most basic level, a Reference Note is a text notation to some aspect of the project. Our Reference Notes system includes three types of notes. You could easily use all three types in a project, or primarily only one type. The three note types are:
- Basic Numbered Note: This simply applies a number from 1 to 99 to notes as you enter them. This type of note is best used if your project requires only a limited number of notes, such as a simple project where you want to enter a few notes. Remember: It's often of value to use this system even if you think you have only one note to enter. In many cases, you may think of another note later ... then another ... and pretty soon, you regret not using the system. Even with a very small number of notes, the system is of value.
- CSI Division Organized Notes: These are notes that are organized by Construction Specification Institute (CSI) Division of construction. This type of organization is especially valuable in two ways: (1) You have a fairly large number of notes, and this system allows the notes to be organized and grouped by construction division, for easier retrieval and organization. (2) The notes you use on a project are organized by Division of construction, and just a list of the notes may be of value to your specification writer for the project.
- One-Two Letter Identifier: These identifiers can be helpful in organizing notes in a user-friendly system relating to the note type, such as, D for Demolition, P for Paving, F for Fence, ST for Stairs etc. This system also allows the notes to be grouped by the topic.
If you want, you can even mix any and all of the above methods of notes on any one project.
You can add a cost factor to the note to keep track of costs of that item. You can also add a detail reference to any of the notes, where a detail will be added to our Detail System.
Using Reference Notes to Spec Amenities from Manufacturers
With Reference Notes, you can spec products from specific manufacturers' catalogs. Because of our Manufacturer Connection, you'll always have access to accurate, up-to-date information from the catalogs of manufacturers who choose to be included in our database. More information
Reference Notes (RefNotes) and the Railing Tool
Quick video

Our Railing tool now has direct integration with Length Reference Notes (RefNotes). For more information on this integration, see our Length Reference Notes documentation.
Assigning a Detail to a Reference Note
Quick video
When adding or editing a Reference Note, you have the option of referencing a detail with that Reference Note (also known as assigning a detail to that Reference Note).
This option allows you to associate a detail with the RefNote you're creating, and thus add that detail to the current project’s Detail Manager. Once you've placed the detail in a drawing, its related detail number and sheet number will be listed automatically within the Reference Note Schedule in a column to the right of the RefNote associated with that detail. You can click Set Detail and associate a detail with a RefNote at any time – you don’t have to associate a detail right when you first create the RefNote.
As the detail number and sheet number appear just to the right of the RefNote they refer to in the schedule, a good way to deal with a detail reference within a RefNote is to include the text "See detail." at the end of the note. You can then associate a detail with that RefNote and later, when you actually place the detail in a drawing, that detail number and sheet number reference will apply automatically.
Assigning a detail to a Reference Note offers two main advantages:
- For one, you can reference the details in a schedule (the Reference Notes Schedule). The schedule will reference the actual sheet where the detail was placed, along with the detail number on that page. You can also choose to export that information out to a spreadsheet. That way, you have an easy-to-copy list of detail locations to include in a bid sheet for contractors, giving them a quick way to reference the detail while bidding. More information and instructions
- The second benefit comes into play when you're using project templates. If you import a Reference Note from a template, and that Reference Note is referencing a detail, it will also import the detail into the project. This lovely feature saves you an extra step of having to also import that detail before you place it on your sheet. For more information, see our Templates documentation.
To assign a detail to a Reference Note, click the ... (Set Detail) button next to the Detail field in the Add Reference Note or Edit Reference Note dialog box to open the Detail Selection dialog box.
If the detail you want to assign to your RefNote has already been added to the current Land F/X project, you'll see it in this list. Click the detail to select it, then click OK to add it to your RefNote.

Adding Details to Your Land F/X Project

If the detail you want to assign to your RefNote hasn't been added to your Land F/X project, you can add it to your project directly from here by clicking New.
The Add Details to Project dialog box will open. Select the detail you want to add to your project, then click Add to Project to add the detail to your Land F/X project. This process works similarly to how you'd add details to your project in the Detail Manager. Click Done when finished adding details.
After you've added details to your project in this way and closed the Add Details to Project dialog box, you'll see them in the list of available details and can click OK to assign a detail to your RefNote.
Importing Details into Your Land F/X Project
You can also import details from another Land F/X project into the current project by clicking Import. Select a Land F/X project or template, then click OK to import the details from that project or template.
After you've imported details into your project, you'll see them in the list of available details and can then assign a detail to your RefNote.

Listing Details in the Reference Notes Schedule
As mentioned above, assigning a detail to a Reference Note means you can list that detail in the Reference Notes Schedule.

To place a Reference Notes Schedule listing details you've assigned to RefNotes follow our instructions to place a Reference Notes Schedule.
Take care to select the Detail option for each RefNote category you'd like to list with its associated details in the schedule.
The Reference Notes Schedule will include all details assigned to RefNotes you've placed in your drawing.


To send the Reference Notes Schedule to a spreadsheet to provide the contractor with a quick reference to your details, for example, select the Spreadsheet option when generating your Reference Notes Schedule.
User Fields and Values
You can add your own custom user fields to your Reference Notes, which will become columns in the Reference Notes Schedule.
The User Fields section of this dialog box includes buttons to:
- Add Field: Create a new user field for a RefNote.
- Add Row: Add a bolded second line to this section.
For further information and instructions on User Fields and rows, see the User Fields and Values section of our documentation on editing RefNotes.
Before you can assign a field to a RefNote, you'll need to assign that RefNote with a Division.

Leader and Callout Style Options
To assign a leader and callout box style to the callouts that will label your RefNotes, use the Callout and Leader options at the bottom of the Add Reference Note dialog box.
We've provided the ability to give each RefNote its own distinct style for callouts, should you want to do so. If you want all your RefNotes Callouts to look the same, take care to set the leader and callout styles the same in each RefNote you create or edit.
Click either the Callout or Leader preview thumbnail to see your style options for your callouts.

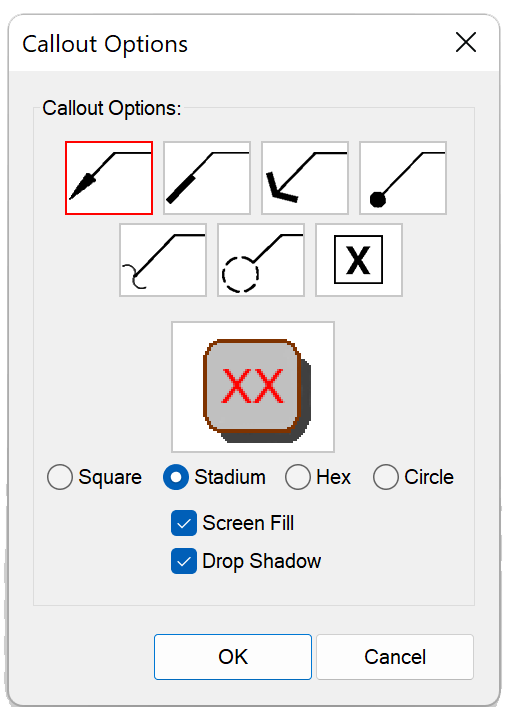
The Callout Options dialog box will open. Here, you can make all your selections for your callout box and leader styles.
After making your selections, click OK to save the changes and close this dialog box.
The options for leader types, each with its own arrow style, are at the type of this dialog box. Click to select your desired leader type.
For no leader at all, select the X option on the far right.

You have four options for your callout box style: Square, Stadium, Hex, and Circle

You can also choose to have your callout boxes include a Screen Fill and/or a Drop Shadow.

Placing Reference Notes
When placing RefNotes, you can press the F8 and F9 keys to toggle between Ortho and Snap modes, respectively. This will allow you to lock your leaders at certain angles.
When you place the note in Model Space (the preferred method), ensure that the scale is set correctly. For more information, see our Set the Scale documentation.

To place a RefNote, click the Place button in the RefNotes Manager.
Note that each RefNote type has its own set of options and methods of placement. For information on placing one of the RefNote types, see our documentation sections on:
- Placing a Notation Reference Note
- Placing a Length Reference Note
- Placing an Area/Volume Reference Note
- Placing an Amenity Reference Note
Highlighting RefNotes in Your Drawing
The RefNotes Manager includes a Highlight button that allows you to highlight all instances of the selected RefNote in your drawing.

This button triggers our Highlight tool, which helps you locate specific plants, RefNotes, and other specific objects in your drawing.
Referencing Multiple Sheets in One Drawing
You may often find yourself wanting to reference several different sheets in one drawing. In these cases, you may want to differentiate between symbols and leaders on different sheets. The RefNotes tool is definitely the best tool to use for those notes.
However, using RefNotes for this purpose will require you to update your standards. We recommend using a single symbol style for all such notes. If you used just the Square style note for all note types, for example, you would technically have the ability to have all notes numbered 1 through 99 by sheet. However, we also recommend against that standard.
You can gain a great amount of capability by grouping your notes by Division. This type of grouping will make it far easier to import notes from other projects. It will also allow to generate a single overall schedule. This would only require setting a single-letter prefix – so your notes could be numbered D-01 through D-09 and S-01 through S-99, for example.
You could then still maintain the different symbol styles, although we do not recommend this practice. The system was engineered assuming there would be a single note style. So, for example, as you create Demo, Layout, and Grading notes, you would have to be careful to select the correct symbol style each time. The chance for error means errors, in our book.
Finally, the simplest way to group the notes by sheet is to have each sheet on a separate DWG file, which follows best CAD practices for sheet setup anyway. Within the same drawing, you could instead place the notes into Paper Space.
RefNotes and Multileaders (MLeaders)
The AutoCAD MultiLeader (MLeader) tool is now built into the following items:
- Length RefNotes
- Notation RefNotes
- RefNotes Callouts
An MLeader is a native AutoCAD feature that renders the leader, arrow, and callout box into a singular, contiguous entity. For more information, see our MLeaders documentation.
Importing RefNotes from a Template or Project
If you find yourself adding the same RefNotes to multiple projects, we recommend setting up a project template and then adding your commonly used RefNotes to that template. You can then import them into a new project from that template. This practice can save you immeasurable amounts of time, considering all the data you need to fill out for each RefNote you create. With templates, you only need to add and configure your RefNotes once, then import them – along with all attached data – into the present project.
For more information and instructions, see our Importing Reference Notes page.
Reference Notes Callouts & Schedules
For information on calling out and creating an inventory of your RefNotes, please see our RefNotes Callouts and RefNotes Schedule pages.
Calling Out RefNotes in Your Xrefs
You can easily call out RefNotes in your Xrefs while still working inside your main drawing. Just make sure that both the drawing you’re labeling inside and the Xref drawing are set to the same Land F/X project. Then label your RefNotes as you would normally.
Reference Notes Preferences
Organizing Your RefNotes
RefNotes are organized by division and subdivision. Our RefNotes Preferences screen allows you to customize the organization of your RefNotes by adding or editing these divisions and subdivisions.
For a full breakdown of the divisions and subdivisions, please see our RefNotes Organization page.
Customizing The Text in Your RefNotes
Our software includes several default Text Styles, which are fully customizable. Several of these Text Styles govern the font, point size, and other characteristics of text that appears in your RefNotes, as well as RefNote callouts and schedules. Please see our Customizing the Default Text Styles page for further information.
Adding Color to RefNote Hatches
You can use our Color Render tool to add color to your RefNote hatches for a color presentation. See our documentation on adding color to RefNote hatches.
Electrical Symbols
Electrical symbols will be displayed in the Reference Note Schedule with thumbnail images of the symbols, and will not require a “note” callout.
You will want to add your own electrical symbols to the library. Use our Save Block tool to do this.
Having a Hatch Issue? Download Our Updated Hatch Patterns Manually
Are you experiencing any of the following issues with your hatches?
- Hatches looking fragmented or broken apart
- Hatches with scales that are too large or too dense
- Hatches that place blank or empty
- Hatches that are not appearing in schedules
- File size bloating
If so, follow our steps to download our updated hatch patterns manually.
Related Webinars
- Getting Started with RefNotes: Our Reference Notes (RefNotes) tool provides a quick way to spec and place site furniture, play structures, hardscaping materials, retaining walls, and pretty much any other item you need in your landscape plan. We'll go over the basics. (58 min)
- Ask Us Anything! Spotlight on RefNote Schedules: Join us to see the unveiling of our revamped RefNotes Schedule and hear about our development intention. (54 min)
- Hardscape Design: Hardscape design with Land F/X is all about Reference Notes (RefNotes). Learn about the myriad options available within our RefNotes tool that will streamline your project's workflow. We'll go over all the basics of RefNotes, including setting up and placing a RefNote, calling out your features, and placing a schedule. (1 hr 2 min)
- Streamlined Life Cycle of a Site & Hardscape Project: You have the tools at your fingertips – including our RefNotes tool – to take your site and hardscape design from concept to construction documentation, complete with quantities, data, callouts, and cost estimates. Learn a complete process spanning the life cycle of each project that will start cutting days off your overall drafting time. (1 hr 3 min)
- Understanding the Manufacturer Connection: The Manufacturer Connection is a dynamic and invaluable relationship that we at Land F/X have pioneered into an exclusive, easy to use tool that benefits both designers and manufacturers. Learn about the work we put into manufacturer content and how to enhance your CAD design and specification processes for site amenities, lighting, and hardscape. (1 hr 1 min)
- Intro to Site Tools: This webinar covers the basics of what our Site tools have to offer, including a segment on the Reference Notes Manager. (1 hr 2 min)
- Common Land F/X Questions: This webinar covers some of our lesser-known tools, including Reference Note User Fields. (1 hr)
- How The Manufacturer Connection Works: The Manufacturer Connection works in conjunction with our Reference Notes tool to help you spec site amenities and hardscape materials from specific manufacturers. Learn all about it here. (53 min)
- Using RefNotes & Cost Estimates: Setting up a project with RefNotes right from concept can help speed up the process to produce accurate detailed drawings, and construction drawings, with cost estimates at every step along the way. We'll go through some advanced-user tips with RefNotes using an actual project. (46 min)
- Importance of Lines in Design: Lines, partitions, and edges are some of the most powerful design tools in a landscape architect's arsenal. Daniel Martin from Permaloc explains the significant economic and environmental benefits of edging with expertise. (54 min)
Troubleshooting
Issue: Selecting a Symbol or Hatch: Block or Hatch Not Available
Issue: Amenity Reference Note Coming in at the Wrong Size
Issue: Hatches are appearing as solid rather than patterns
Issue: A hatch doesn't look right (hatch scale issue)
Issue: A hatch is either too dense or does not render
Issue: Hatch Island / Hatch Multiple feature is not working properly
Issue: Super Hatch & Land F/X software
Issue: Hatch definition not found – error message
Issue: Blocks or hatches are not available when I try to select a symbol
Issue: Font overlapping or spilling out around box generated by a RefNotes callout
Issue: Some of my RefNotes callouts are not resizing (rescaling) when I rescale my drawing
Issue: You are experiencing a significant delay when attempting to add or place Amenity RefNotes
Issue: You need to rescale Reference Notes in your drawing to accommodate a new drawing scale
Issue: Unable to see hatches or colorized plants in a 3D model (AutoCAD or Civil 3D)
Issue: You are unable to edit or call out a RefNote hatch
Issue: Your RefNote callout text is scaled incorrectly – it's too large or too small
Reference Notes Schedule Issues
Issue: RefNotes Schedule has incorrect quantities
Issue: A section title in the Reference Notes Schedule is repeating
Issue: You are unable to send your Reference Notes Schedule to an Excel spreadsheet
Issue: Work Areas are not recognizing or calculating a RefNote hatch
Issue: Reference Notes callouts are appearing behind hatches or other objects when placed in Paper Space
Issue: You saw an error containing the text AcRxClassName when attempting to place a RefNote Callout
Issue: When placing a RefNote hatch, you saw the following error message: Unable to locate target hatch
Issue: Several buttons in the Reference Notes Manager are grayed out and inaccessible
Issue: Bad DXF group (10) error when placing a Reference Note
Issue: Text boxes are displaying in your drawing where your RefNote Callouts should be
Issue: Your RefNotes Schedule text is scaled incorrectly – it's too large or too small
Issue: Text in the RefNotes Schedule columns is overlapping
Issue: Different Reference Notes Callouts are appearing in different styles in the same drawing
Issue: The text in your RefNote callouts is appearing scrunched, pushed together, or overlapping
Issue: Error: File ... .dwg Was Created by an Incompatible Version of AutoCAD when placing RefNotes
Issue: Error: "Unhandled exception in dcl-slideview-load ARX" when placing RefNotes
Issue: You want to place site amenities based on latitude and longitude
Issue: Error: 'Bad argument type: 2D/3D point: nil' when working with Xrefs
Issue: Your RefNote Callouts are empty
Issue: The leader line appears to extend into the label portion of one or more of your RefNote Callouts