Reference Notes Schedule (RefNote Schedule)
Quick video
- Upgraded RefNotes Schedule (August 2024)
- Reference Notes Schedule Overview
- Schedule Destination & Schedule Integration
- Entire Palette
- Renumbering Multiple Reference Notes
- Schedule Options
- Schedule Symbol Scaling
- Renaming or Editing the Reference Notes Schedule
- RefNotes Schedules and Work Areas
- Dual-Language Divisions and Subdivisions
- Options for Placing a Schedule in a Drawing with an Existing Schedule
- Length Reference Notes
- Schedule Text in Uppercase (or in Upper and Lowercase)
- Create a Background Fill or Mask for Your Schedule
- RefNotes Schedules and Slope Areas
- Schedule Integration: Send RefNotes Schedules Directly to Another Provider
- Related Webinars
- Troubleshooting
Quick video
The Reference Notes Schedule (RefNote Schedule) is essentially a materials schedule that lists the Reference Notes you've used in your drawing. Reference Notes, or RefNotes, can include site amenities, boulders, pagodas, hardscaping materials, retaining walls, and any other smart site or hardscape objects you've added to your Land F/X project and placed in a drawing. You can configure the schedule to include, or not include, descriptions, quantities, and other items you've assigned to your RefNotes.
The RefNote Schedule can also include RefNotes that have been placed in your external references, or Xrefs.
For many RefNotes, the callout is what will appear in the schedule. Take care to call out at least one instance of each RefNote in your drawing. See our RefNote Callouts documentation for instructions.
Upgraded RefNotes Schedule (August 2024)
In a months-long development effort, the RefNotes Schedule has been completely rewritten as of August 2024, also impacting all Site-related schedules:
- Concept Graphics
- Zoning
- Civil/Survey
- Northing/Easting Point
- Lighting
- Keynote
- Detail Report
- Project List
- Sheet Index
- Irrigation Zones
Generalized improvements include:
- Faster performance
- Revised Regen/New/Edit dialog box
- Header styles
- Column width controls
- Schedules with dedicated dialog boxes now have Edit capability
- Improved logic for schedule symbol scaling More information
We've also included a vast number of wishlist items, such as:
- Photos in RefNote Schedule
- Column reordering
- Northing/Easting point translation
- Sheet Index options
- Concept Graphics schedule having portrait and landscape modes
Future schedule wishlist requests are now much easier to implement.
See our Ask Us Anything! Spotlight on RefNote Schedules webinar to see the updated schedule in action.
Reference Notes Schedule Overview
After placing your Reference Notes, you can list them in the Reference Notes Schedule. Open our Reference Notes Schedule tool:

F/X Site ribbon, Reference Notes Schedule flyout
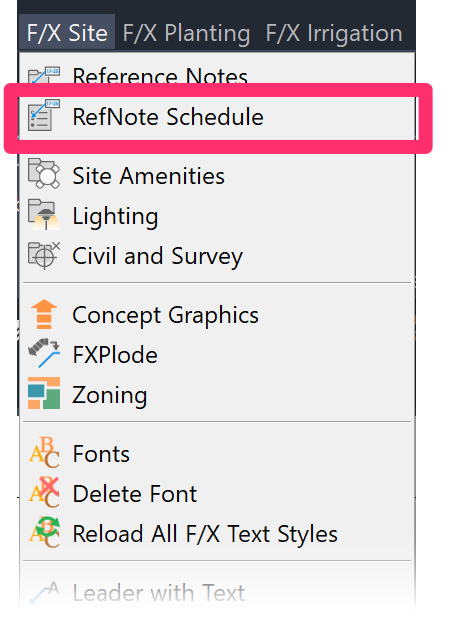
F/X Site menu, RefNote Schedule option
You can also generate a Reference Notes Schedule by clicking the Schedule button in the RefNotes Manager.

The RefNote Schedule dialog box will open. Here, you can configure your RefNotes Schedule.

1. Destination: Choose how and where to place or send your schedule.
We've replaced the Drawing and Table options with a single Table option and a Gridlines non-plot checkbox. More information
2. Entire Palette: Option to run the schedule on all RefNote items in the project, regardless of what has been placed into the current drawing. More information
3. Include Xrefs: Include RefNotes from your external references (Xrefs) in the schedule.
4. Renumber: Option to automatically renumber your RefNotes when placing a schedule.
5. The Options section provides several settings for configuring your schedule. More information
6. Options to identify Length, Amenity, and Area/Volume RefNotes by their Code, Symbol, or Both in the schedule.
7. Options to identify RefNotes in the schedule with:
- A Photo you've assigned to the RefNote using our Photo Callout tool.
- The Symbol assigned to the RefNote.
- The Code assigned to the RefNote.
8. Option to include the Quantity of the selected RefNote type in the schedule.
9. Option to include a per-unit Cost in the schedule for each RefNote type in the selected category.
10. Option to list a Detail assigned to each RefNote in the selected category.
Click OK to place the schedule.
If you have multiple Work Areas defined in your drawing, you'll then be prompted to select one or all of these Work Areas.
Selecting one or more Work Areas when running your schedule is a great way to either limit your schedule to one area or phase of your project or break your schedule down according to your Work Areas. See the section below on The RefNotes Schedule and Work Areas.
The drawing will go back to Paper Space, and the Command line will prompt: Upper left corner.
Click a location in the drawing to set the location of the upper left corner of the location where you want to place the Reference Note Schedule.
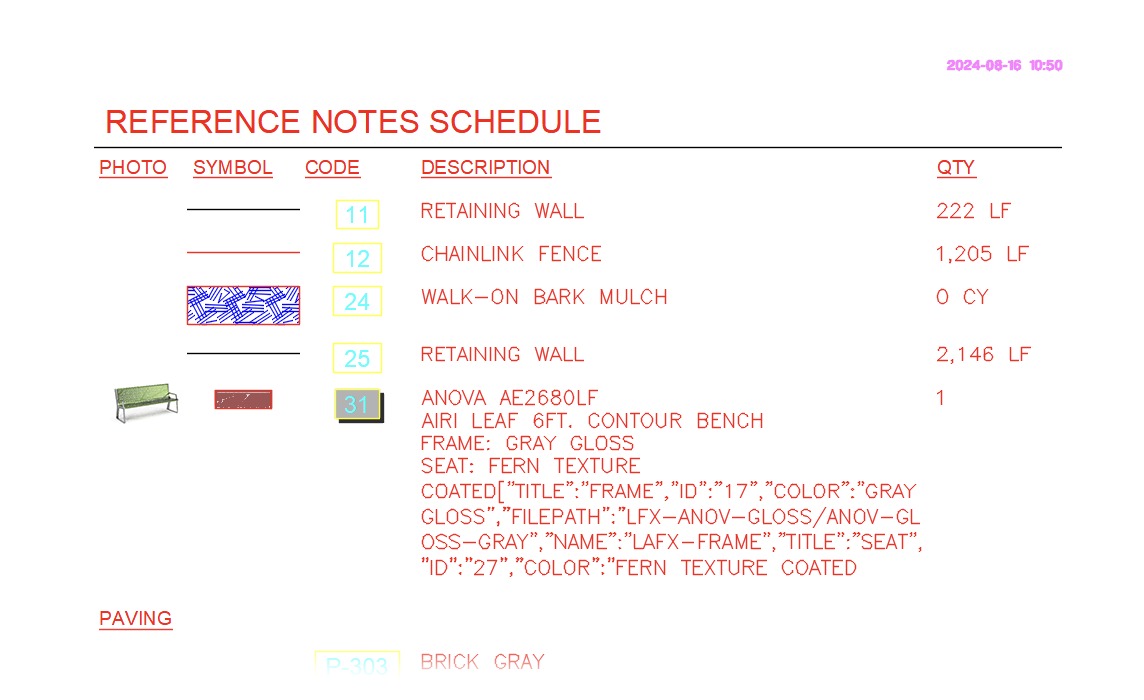
- Only the RefNotes you've placed into the drawing will show up in the Schedule.
- If you used Work Areas in your site base, you can choose to list only the RefNotes in one, some, or all of those Work Areas.
- The number associated with a RefNote will always stay with that RefNote throughout the project.
- You can always run a schedule for just a certain Division or type. You can then double-click the schedule title and change it from REFERENCE NOTES SCHEDULE to the title of your choice (example: PAVING LEGEND).
When you run a schedule for a Work Area, it will only include the items that are within the polyline containing that Work Area – and thus not any RefNotes appearing in Paper Space. If you freeze the Work Area layer, the schedule will include the RefNotes in Paper Space. You can also use the CHSPACE command (type CHSPACE in the Command line) to move the RefNotes into Model Space, where they can fall within the Work Area boundary – and thus appear in the schedule.
Schedule Destination & Schedule Integration
The Destination section of the RefNote Schedule dialog box includes several options for how and where you want to place or send your schedule.
- Table: Place the schedule in your drawing as a table.
- Gridlines non-plot: Check this option if you want the lines separating the table cells to be non-plot. Uncheck this option if you want the table lines to plot.
We've replaced the Drawing and Table options with this single Table option and the Gridlines non-plot checkbox. If you select Gridlines non-plot, the schedule will place with gray gridlines that will not show up when you plot your drawing (essentially the same as the former Drawing option). Deselecting this option will result in a schedule placing as a table with gridlines set to plot (essentially the same as the original Table option). This updated system allows you to edit your schedules much more easily.
- Spreadsheet: Export the schedule to a spreadsheet program such as MS Excel.

Sending a Schedule to a Spreadsheet
Exporting a schedule to a spreadsheet using a program such as MS Excel gives you an infinite number of options in formatting and enhancing that schedule. In a spreadsheet, you can easily make edits, add specific calculations, create new information columns, and make the schedule available to a client or contractor who doesn't have AutoCAD.
Quick video
Creating a Macro for a Schedule in MS Excel
A macro is a recorded set of actions that can be applied automatically to a spreadsheet with the click of a button. You can create your own macro in Excel to include custom columns, carry out automatic calculations on preset columns, and much more. For example, you might need to calculate the percentage of the plant total occupied by each plant in a project. With a macro, you can carry out these calculations instantly. See our article on creating a macro in MS Excel for a schedule.
Entire Palette
Select the Entire Palette option to list all the RefNotes you've added to your Land F/X project in the RefNotes Schedule, whether or not you've placed them in your drawing.
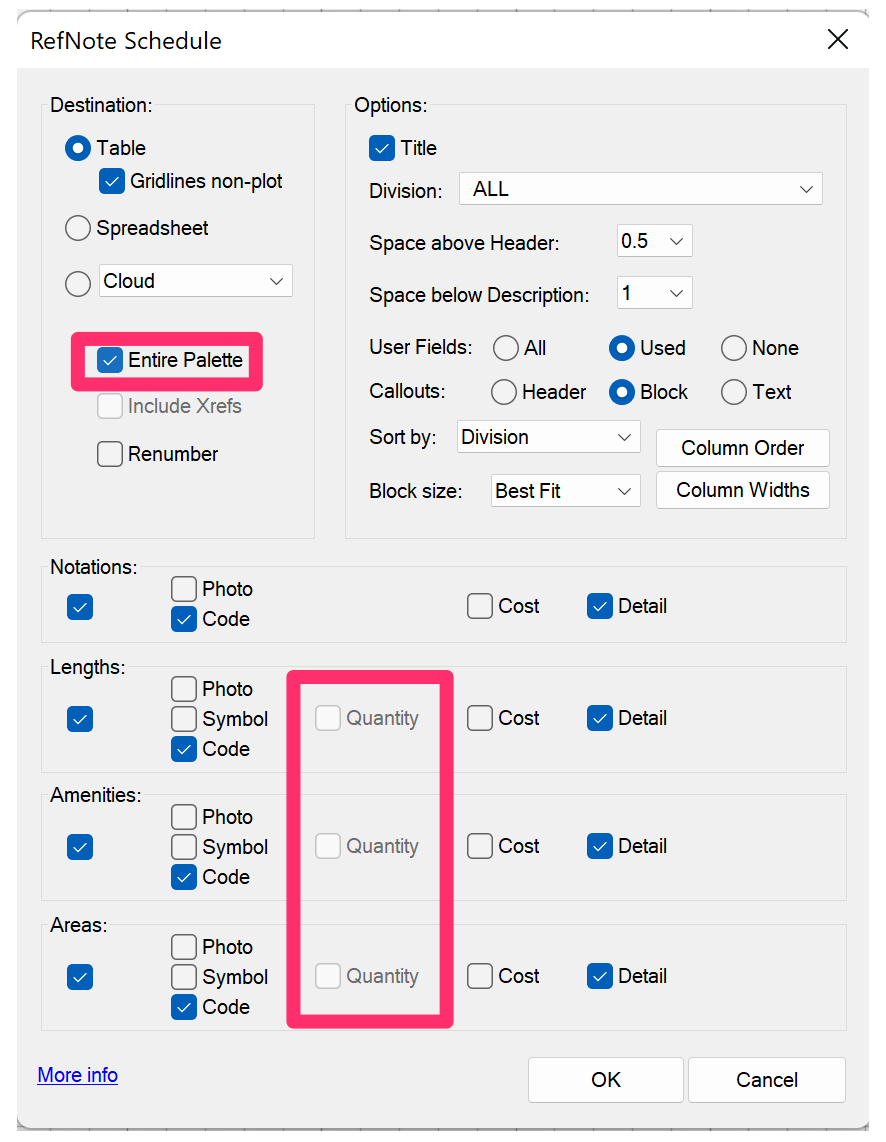
Use this option to review your RefNotes early in a project, which will help you determine what you need to add or delete.
Note that an Entire Palette schedule will ignore quantities, and the Quantity option for each RefNote category will be grayed out and not available for selection when Entire Palette is selected.
You can run an Entire Palette schedule without having placed any RefNotes at all, or from a temporary blank drawing. You can place the schedule in your drawing or send it to a spreadsheet for review of the project data.
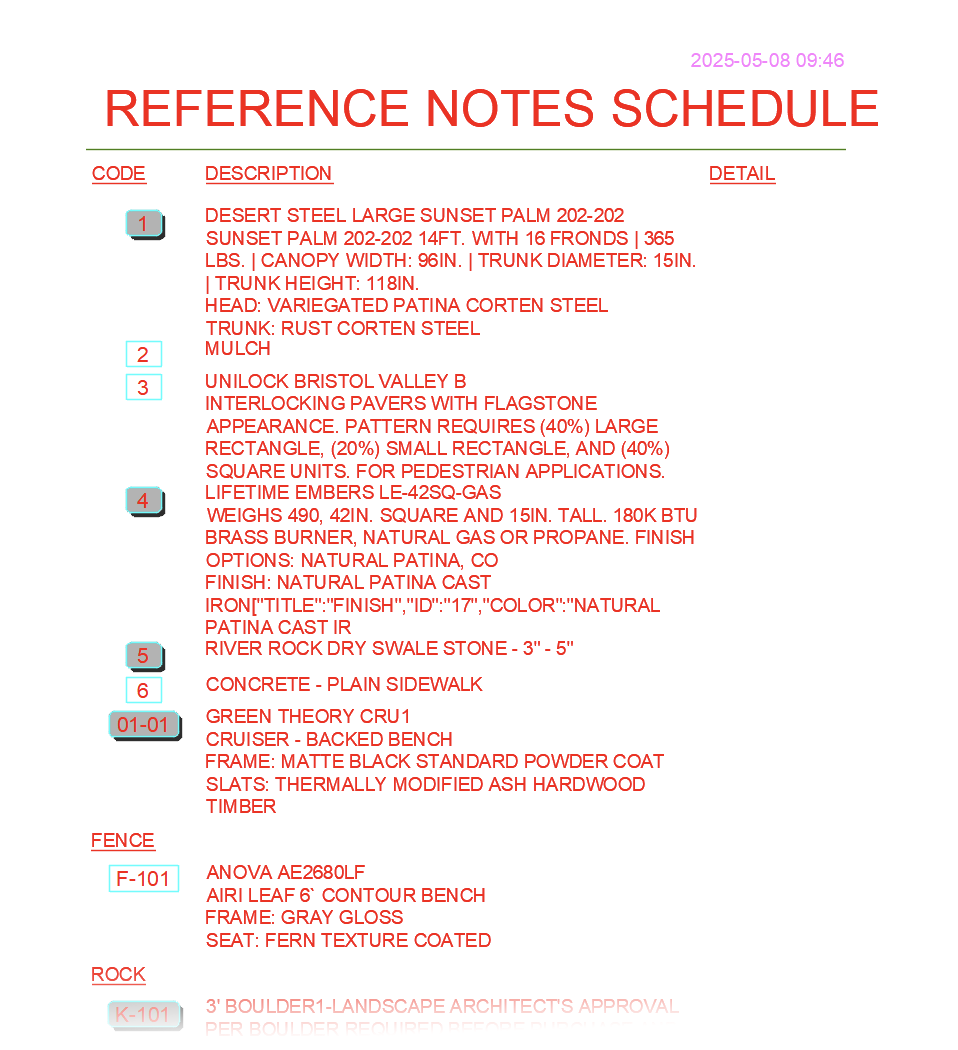
Here is an example of a RefNotes schedule created with the Entire Palette option selected.
Renumbering Multiple Reference Notes
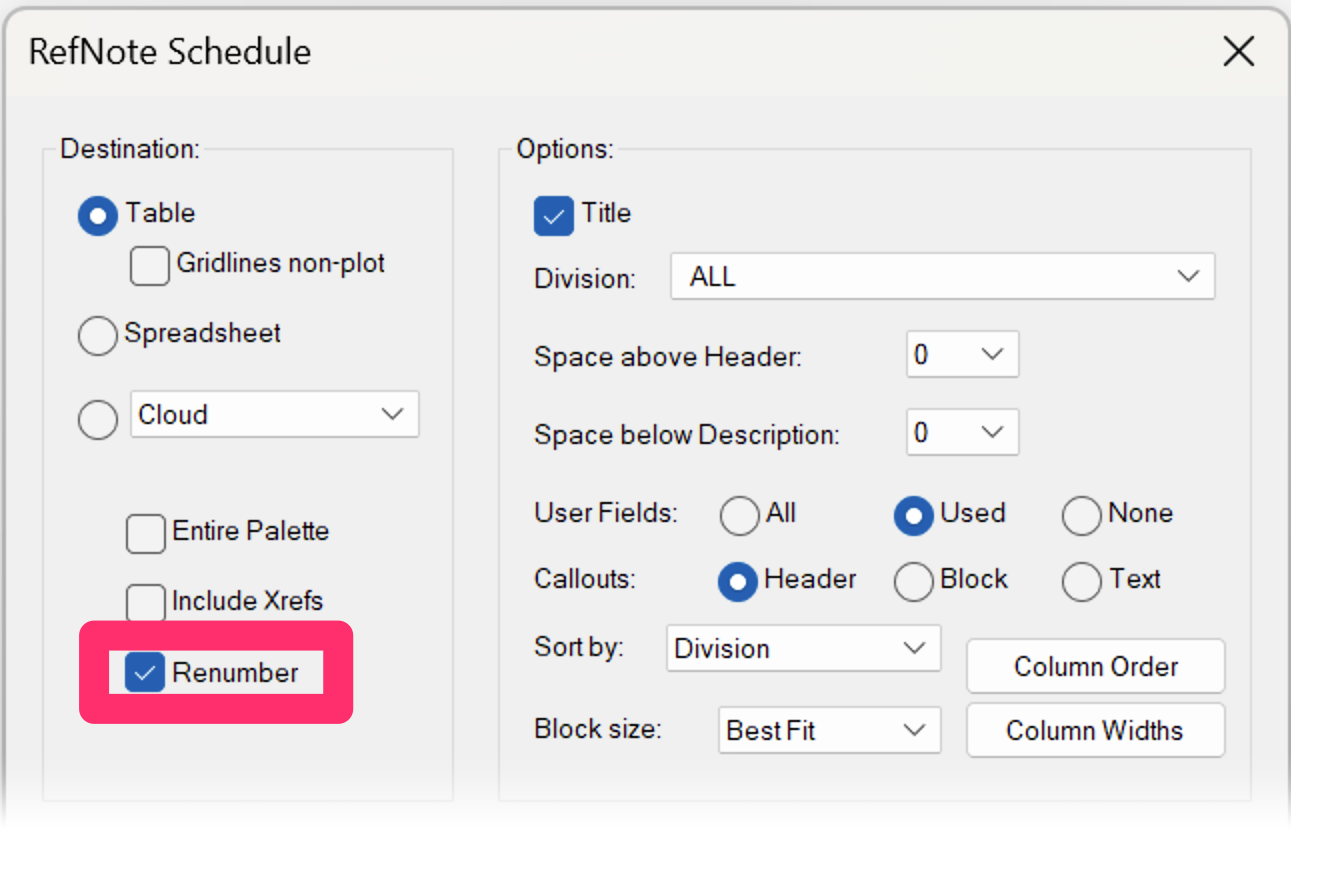
When you delete Reference Notes from a project, numbering of any additional notes you place will continue from the highest numbered Reference Note you deleted.
To renumber your Reference Notes to start from the beginning, check the Renumber box when generating a Reference Note Schedule.
Your Reference Notes will be renumbered automatically.
Schedule Options

1. Option to include the Title of each of your RefNotes in the schedule.
2. Division: Limit your schedule to cover one of your RefNote Divisions, or select ALL to include all Divisions.
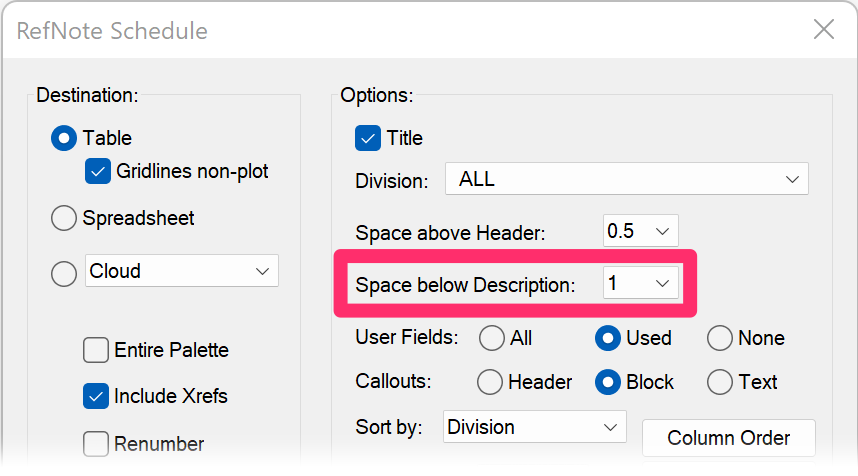
3. Options to set the spacing:
- Above the schedule header.
- Below the description of each RefNote.
4. Options for including the User Fields (which you fill out when creating RefNotes) as columns in the schedule. Choose whether to show All fields, only the fields you've Used, or None of the fields.
We've added automatic hyperlinking to RefNote field values. If you enter a URL (a link to a website) as the value of a user field when editing a RefNote, Land F/X will convert that URL into a hyperlink when it is listed in the RefNotes Schedule.
5. Option to include each RefNote callout in the schedule as a Block (the entire callout box with frame) or Text (just the RefNote code without a callout frame).
6. Option to sort the schedule by Division or Object type.
7. Select the size at which RefNote symbol blocks will appear in the schedule. More information
8. Configure your schedule Column Order.
9. Configure your schedule Column Widths.
Reference Note Divisions and Subdivisions
When you create or edit a RefNote, you have the opportunity to place it into a Division and Subdivision.
For detailed information on these Divisions and Subdivisions, see our Reference Note Organization documentation.


Whether or not you select a Division and Subdivision when creating a RefNote will affect the way that RefNote is organized in the Description column of the schedule.
If you don't select a Division at all, the RefNote will be listed in a general category simply called Description.
Selecting a Division and Subdivision for your RefNotes will reorganize this column, creating separate sections in which your RefNotes will be grouped.
Here's an example of a RefNote assigned to a Subdivision called UNIT PAVING under the Division PAVING:


If we were to select only the Division PAVING for this RefNote, it would be listed in the Description column under a section called PAVING.
If your RefNotes aren't organized to your liking in the RefNote Schedule, it's time to take a look at the Divisions and Subdivisions you've set for each RefNote. More information
Column Order
Click the Column Order button to reorder the columns in your RefNotes Schedule.
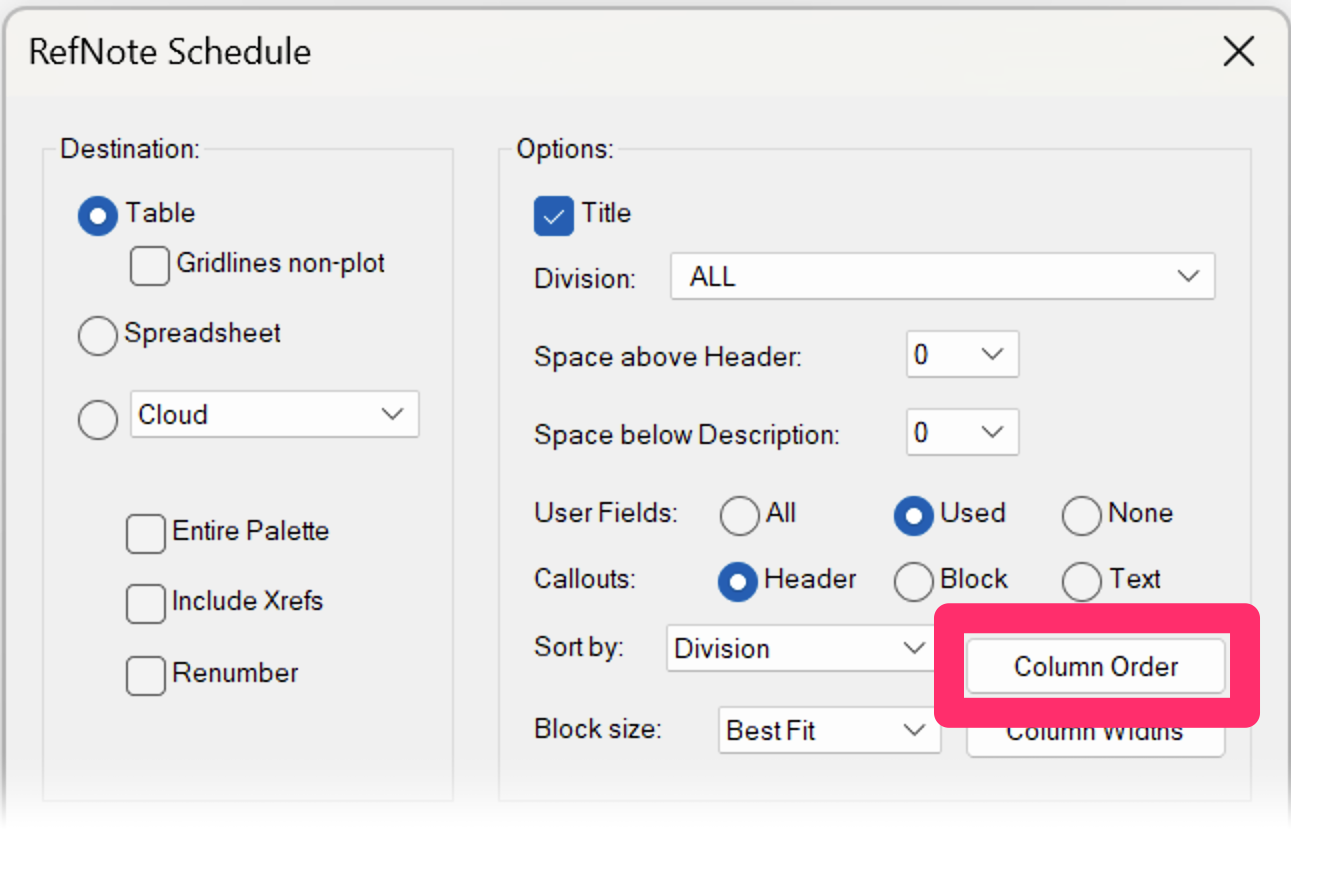
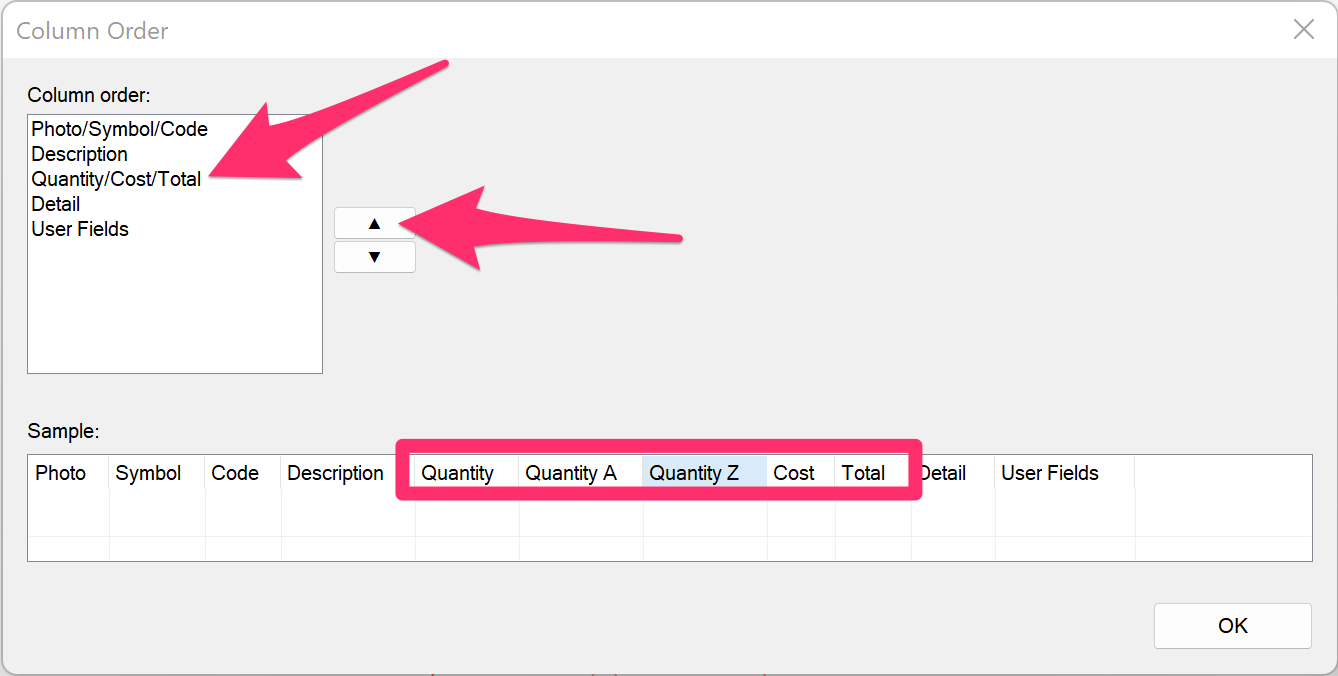
In the Column Order dialog box, select a column title, or group of column titles, you'd like to move in the order, and use the arrow buttons to move it up or down. The up arrow will move the selected column or column group to the left in the resulting schedule, and the down arrow will move it to the right.
In this example, we'll select the Quantity/Cost/Total column group, which corresponds with the Quantity, Cost, and Total columns. We'll then use the up arrow to move this column group up in the order, which will move those columns to the left in the schedule.
Note that the Sample section at the bottom of the dialog box shows the current order of the columns as they will appear in a resulting schedule. In our example, the three Quantity entries appear to the right of the Names, Size, and Spacing column entries.
The selected column title will move up or down in the Column order list after you reorder it, and the corresponding entry will move to the left or right in the Sample section.
In our example, the Quantity/Cost/Total column has moved up in the list, and the Quantity, Cost, and Total entries have moved to the left of the Description column entry in the sample order section.


We've engineered this feature to require the identifying Photo, Symbol, and Code columns to remain the leftmost columns in the schedule.
If you attempt to move these columns down in the list, or move any other column above them, you'll see a message that The first column must remain Photo/Symbol/Code.
Column Widths
Click the Column Widths button to configure the widths of the columns in your RefNotes Schedule.
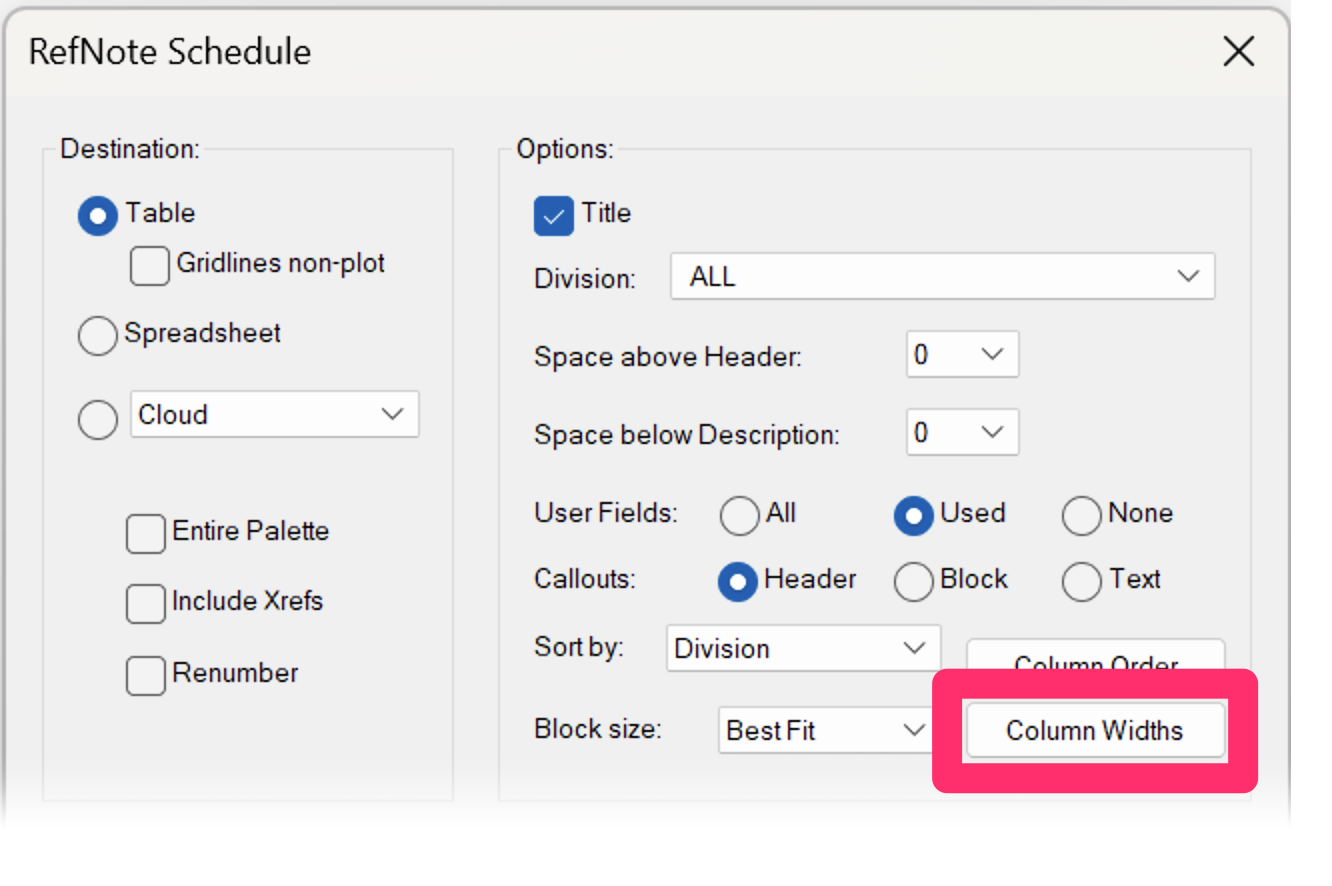

A section titled Column Widths will pop down in the schedule dialog box. Set a value for each column width as needed, then click OK.
Schedule Symbol Scaling
One of the many improvements we made to the RefNotes Schedule with our 2024 update is the logic behind the symbol scaling. RefNotes Schedule symbols are now positioned top center in their table cell, and they scale to fill 50% of the cell. The height of the cell is determined by the height of the description cell. The width of the symbol cell is set by the widest symbol or in the column widths adjustment.
To increase the height of the symbol cell, thereby increasing the size of the schedule symbol, you can either:
Block Size
The RefNote Schedule dialog box includes a Block size menu for further control of your schedule symbol scaling. The menu includes the following options:
• Best Fit: The RefNote Schedule will be placed as if there is no symbol, then the block will be scaled to fit up to 50% of the cell width and the cell height, minus one height of text. The Symbol column width and the Space below Description setting will still affect table size.
• Plan Size: RefNote Schedule symbols will be scaled to match the plan size. The table cells will enlarge as necessary to allow the blocks to fit.

• 1-5x Text Height: These settings configure the row height as specified, plus one more for space between each row. The block may still be constrained by the width of the symbol column, which you can adjust separately. The block will scale the same as with the Best Fit option, in that it will scale up to 50% of the cell width, or the cell height minus 1 text height. Click the Column Widths button to configure the widths of the columns in your RefNotes Schedule.
The Text Height settings apply the text height to the Symbol column. If the Description column is taller than the setting, nothing changes. This setting makes it possible to have similarly sized symbols with differently configured descriptions. To achieve this, we recommend matching the text height settings for the tallest Description column.
Renaming or Editing the RefNote Schedule
When you place a RefNote Schedule, the schedule title will have the title Reference Notes Schedule by default. If you want to change the title, or otherwise edit the appearance, of a schedule you've already placed, double-click anywhere on the schedule text.

The Enhanced Attribute Editor dialog box will open. Select the Attribute tab, and type your new title in the Value field (example: Site Materials). Click OK to save your changes.


You can also make various changes to the schedule font by selecting the Text Options tab, as well as changes to colors and layers by selecting the Properties tab.
Click OK when finished making your edits. The schedule will regenerate reflecting your changes.

Dual-Language Divisions and Subdivisions
We've added the ability to assign two languages to each of your RefNote divisions and subdivisions, which can then be listed in your RefNote Schedules.
First, follow our steps to create divisions and /or subdivisions with dual-language titles in the RefNotes Preferences.
When placing a RefNotes Schedule in a drawing that includes RefNotes from that division or subdivision, take care to select the Table option as your schedule destination.


Your secondary language title will be listed beneath the primary language title of that division or subdivision in the schedule.
Reference Notes Schedules and Work Areas
Functioning essentially as drawings within a drawing, Work Areas allow you to divide your site into a number of distinct areas. In this way, you can break up your design into separate regions, phases, scope-of-work requirements, and virtually any other way you can imagine. This feature makes it possible to limit any of your site schedules, including RefNotes Schedules, to specific Work Areas. You can also break up your schedule to show separate summaries of Site Development items in each Work Area. For information on dividing your Site Development schedule (or any other site schedule) in this way, see our Limiting Site Schedules With Work Areas documentation section.
If you run a RefNotes schedule by Work Area and the quantities appear to be off, the most common cause is an AutoCAD selection bug. When you run a schedule in this way, the system needs to zoom out far enough to see the entire Work Area.
Before you select a Work Area, zoom out so the entire Work Area is visible on the screen. Doing so will allow the schedule to generate with the correct quantities.
For more information on setting up and working with Work Areas, see our Work Areas page.
Options for Placing a Schedule in a Drawing with an Existing Schedule
When you select the Reference Notes Schedule tool in a drawing where a RefNotes Schedule has already been placed, you'll see a dialog box offering the following options:
- Regen: Regenerate the existing schedule by deleting it and placing a new schedule.
- Edit: Open the Reference Note Schedule dialog box and reconfigure the settings for the existing schedule.
- New: Place a new schedule in addition to the existing one.

Length Reference Notes
Our Reference Notes Schedule tool interacts with Length Reference Notes in a specific way, calculating the lengths of layers from your main drawing and your Xrefs (if you select that option when placing the schedule). For further information, see our Length Reference Notes and the Reference Notes Schedule documentation section.
Schedule Text in Uppercase (or Upper and Lowercase)
You can control whether the text in any of your schedules appears in all uppercase, or in upper and lowercase, from the General Preferences. For instructions, please see our Schedule Text in Uppercase Knowledge Base article.
This setting will apply to all schedules you place in your drawings, including:
- Plant Schedule
- Irrigation Schedule
- Details Schedule
-
Site schedules such as:
- Reference Notes (RefNotes) Schedule
- Lighting Schedule
- Concept Schedule
- Zoning Schedule
- Site Development Schedule
- Grading Schedule
Create a Background Fill or Mask for your Schedules
Some designers want to give their schedules a background fill to allow it to pop from the rest of the drawing. You can create a background fill for your schedule using the Table Style Manager. Find out how.
RefNotes Schedules and Slope Areas
Slope Areas work with our Slope Callout tool to apply a specific grade percentage or ratio to a closed polyline area in your drawing. Objects represented by any smart hatches within those closed polylines (Slope Areas) will have their quantity, volume, or area recalculated based on that slope percentage or ratio.
If you run a RefNotes Schedule in a drawing that includes one or more Slope Areas, the schedule will scan all Area/Volume RefNote hatches to determine whether they are inside a Slope Area. If so, the schedule will recalculate the square footage/meters of those areas, along with any resulting changes in quantity or volume.
Slope Areas in Xrefs
Schedules will recognize Slope Callouts in Xrefs, as long as the Xref is on the layer L-SLOPE-AREA and the schedule is configured to include Xrefs. Schedules configured to include Xrefs will also recognize Slope Areas in the live drawing even if the RefNote hatches calculated by the schedule are in an Xref.
Schedule Integration: Send RefNotes Schedules Directly to Another Provider
Our Schedule Integration tool allows you to send your RefNotes Schedules directly to another service provider – for instance, your company’s estimating and invoicing system. See our Schedule Integration documentation for more information.
Related Webinars
- Ask Us Anything! Spotlight on RefNote Schedules: Join us to see the unveiling of our revamped RefNotes Schedule and hear about our development intention. (54 min)
- Getting Started with RefNotes: Our Reference Notes (RefNotes) tool provides a quick way to spec and place site furniture, play structures, hardscaping materials, retaining walls, and pretty much any other item you need in your landscape plan. We'll go over the basics. (58 min)
- Hardscape Design: Hardscape design with Land F/X is all about Reference Notes (RefNotes). Learn about the myriad options available within our RefNotes tool that will streamline your project's workflow. We'll go over all the basics of RefNotes, including setting up and placing a RefNote, calling out your features, and placing a schedule. (1 hr 2 min)
- Streamlined Life Cycle of a Site & Hardscape Project: You have the tools at your fingertips – including our RefNotes tool – to take your site and hardscape design from concept to construction documentation, complete with quantities, data, callouts, and cost estimates. Learn a complete process spanning the life cycle of each project that will start cutting days off your overall drafting time. (1 hr 3 min)
- Excel With The Right Tools: No matter how much you can accomplish in AutoCAD, sometimes MS Excel can do the job better. We’ll give you some examples of how Excel can improve your design process by adding everything from shade analysis reports to MAWA calculations and in-depth watering schedules. (1 hr 5 min)
- Excel With The Right Tools Part 2: Now that we've gone over the basics of what MS Excel can do for you, join us for a more detailed look into the capabilities of this powerful application, including named ranges, templates and reusable macros, and more. (1 hr 5 min)
- Intro to Site Tools: This webinar covers the basics of what our Site tools have to offer, including a segment on the Reference Notes Manager. (1 hr 2 min)
- Common Land F/X Questions: This webinar covers some of our lesser-known tools, including Reference Note User Fields. (1 hr)
- How The Manufacturer Connection Works: The Manufacturer Connection works in conjunction with our Reference Notes tool to help you spec site amenities and hardscape materials from specific manufacturers. Learn all about it here. (53 min)
- Using RefNotes & Cost Estimates: Setting up a project with RefNotes right from concept can help speed up the process to produce accurate detailed drawings, and construction drawings, with cost estimates at every step along the way. We'll go through some advanced-user tips with RefNotes using an actual project. (46 min)
Troubleshooting
Issue: RefNotes Schedule has incorrect quantities
Issue: A section title in the Reference Notes Schedule is repeating
Issue: You are unable to send your Reference Notes Schedule to an Excel spreadsheet
Issue: Work Areas are not recognizing or calculating a RefNote hatch
Issue: Schedule Text or Schedule Title is appearing in the wrong font, point size, etc.
Issue: The screen flashes several times when you place a RefNotes Schedule in Paper Space
Issue: Text boxes are displaying in your drawing where your RefNotes Schedule should be
Issue: Your RefNotes Schedule text is scaled incorrectly – it's too large or too small
Issue: Text in the RefNotes Schedule columns is overlapping
Issue: CAD freezes or lags after you place a Reference Notes Schedule
Issue: Your plant symbols are showing up with transparency when placed in your drawing
Hatches are missing or coming in at the wrong scale/size in the Reference Notes Schedule


