
Setting a Server to a Static IP: Windows
Updated on: February 16, 2024
Issue
Your office needs to set your Windows server to a static IP address.
Solution
Open your Windows Start menu. Type cmd in the search box, then press Enter.

The Command prompt will open.

Type ipconfig /all at the prompt, and press Enter.
Record the entries you see for the following items:
- IPv4 Address
- Subnet Mask
- Default Gateway
- DNS Servers
Record the information you see in your own Command prompt. The information shown above is just an example.
Open your Control Panel, and navigate to the Network and Sharing Center.


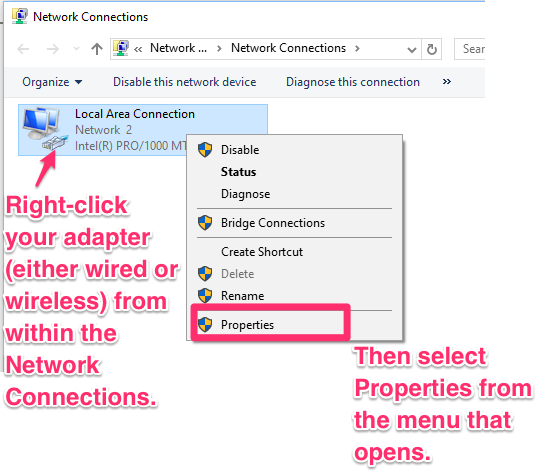
Select Change adapter settings in the left pane.
Locate your adapter (either wired or wireless), right-click it, and select Properties from the menu that opens.

The Local Area Connection Properties dialog box will open.
Select the Internet Protocol Version 4 (TCP/IPv4) and click Properties.
The Properties dialog box will open for Internet Protocol Version 4 (TCP/IPv4) Properties.
Select the Use the following IP address: option. Then fill out the three fields with the following information, which you found in the Command prompt above:
- IPv4 Address
- Subnet Mask
- Default Gateway
Select the Use the following DNS server addresses option. Enter the DNS Servers values (provided by your ISP/Company) from the Command prompt above. You may also wish to use the public DNS addresses provided by Googleor OpenDNS.
Note that these text fields will autofill with periods every three digits. However, if you're entering an IP address with one or two digits between periods, you'll need to enter that period manually. So for example, if the IP address you need to enter is 192.168.1.12, you'll need to type 1921681.12.

Take care when setting your IP address. Setting it to your most recent IP is actually a bad idea, as it means that address is in the DHCP pool. So technically, you should either pick a number very far out of your DHCP pool, or also edit that pool. Some people like the server at .1, some like it at .254. We recommend setting printers at .200 through .250, routers at .254, servers at .253 and down, and DHCP addresses starting at either 1 or 100.
You generally do not want to just use the same IP address in all the text fields shown above. These steps really involve some IT skills and should really be carried out by an IT professional who is really thinking about what addresses your router is assigning to computers and employee smartphones, etc.
But for instance, a common setup architecture is:
192.168.1.1 – router
192.168.1.2 – dns server
192.168.1.3 – anti-virus firewall
192.168.1.10 – primary file server
192.168.1.11 – backup file server
192.168.1.100 – 200 – workstations (dynamic addresses)
192.168.1.201 – 254 – printers, phones, fax machines, cameras
Once you've entered the necessary information, click OK. Your server will now be set to a static IP.