
Create an Automatic Task to Back Up Your Land F/X Data (Backup Script)
Updated on: May 17, 2022
Issue
You want to run a Backup Script periodically to back up your Land F/X data.
The Backup Script is intended to be used as a scheduled backup method, which can be run daily, weekly, or monthly. Note that you will only be able to create a scheduled task with the batch script if you have admin-level access.
Solution
- Step 1: Download and Extract the Backup Script File
- Step 2: Edit the Backup Script File
- Step 3: Create a Scheduled Backup Task
- Step 4: Test the Backup Task
The following steps will show you how to create a scheduled task to run regular backups for Land F/X, which we recommend doing daily, weekly, or, at the least, monthly.
To create a scheduled task to run the Backup Script, you'll need admin status.
Step 1: Download and Extract the Backup Script
1A. Download the Backup Script file linked below.
The file will be downloaded as a zip file.
1B. Right-click the downloaded zip file, and select Extract or Extract All from the menu that opens.

1C. Select a location to extract the file.

1E. Within the folder Backup Script, you'll see a file named LandFX_Backup.cmd.

This file will need to be edited to reflect the source of your data file and the location where you want to back it up. We'll show you how to do that in Step 2 below.
Step 2: Edit the Backup Script File
We recommend using a text editor such as Notepad++ or Sublime Text, but you can also use Notepad, which will work just as well. The file will have Notes/Remarks that will inform you what will need to be edited.
Note/Remark Example: REM ----------------------------------Set Land F/X folder location:
Here's how to edit your Landfx_Backup.cmd file:
2A. Once you've extracted the file LandFX_Backup.CMD, right-click this file and select edit from the menu that opens.

2B. The backup script file will open your default text editor – in most cases, Notepad.
2C. Where prompted to Set Land F/X folder location, enter the path of the location in your LandFX folder that currently contains your Land F/X data. Example: landfxdatafolder="c:\landfx\data"
Don't know where your LandFX folder is? Here's how to find it.
Important: The path to the folder should go within the existing quotation marks in the Notepad document. Do not edit any text outside the quotation marks.
2D. Where prompted to Set Land F/X Backup folder location, enter the path of the location where you want your Land F/X data to be backed up.
Examples include a thumb drive or external hard drive, or a network share location that's backed up regularly. Again, only edit the text within the quotation marks, and make sure to include the drive letter. Example: landfxbackupfolder="R:\%folder%"
You will only need the folder path if the letter drive does not go directly to where you're trying to go.
For example, let's say you have a mapped share to R: (\\example\company folder\backups). In this example, in the script for setting the backup folder location you would only use R:
If your backup path went like this: R: (\\example\company folder), and you wanted your backups to go to another folder within that folder tree named Backups, you would need to use R:\backups in the backup folder location line in the script.
2E. Finally, where prompted to Set the Backup Path for lfxbackupdatapath, enter the location where you want your Land F/X data to be backed up again. Example: lfxbackupdatapath=R:\%folder%
2F6. Save and close the file.
Step 3: Create a Scheduled Backup Task
3A. Double-click the downloaded file to unzip it.
3B. Open the Control Panel and select Administrative Tools.


3C. Double-click the Task Scheduler option in the Administrative Tools dialog box.
3D. Select the Task Scheduler (Local) option from the left pane in the Task Scheduler dialog box.
Select the Create Basic Task option.


3E. Type a name for the backup process you're creating in the Name field.
You can also type a description of the task in the Description field if you want.
Click Next.
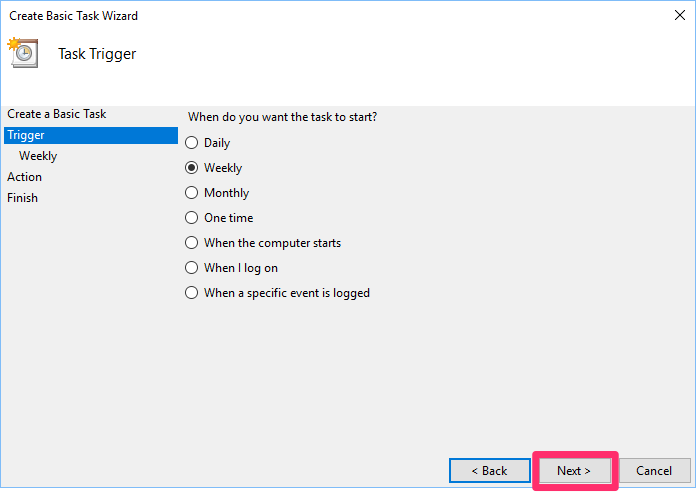
3F. Select the frequency at which you want to do the backups (example: Weekly).
Click Next.

3G. Configure the dates, day of the week (if applicable), and time when you want to run the backup.
Click Next.
3H. Select Action from the left pane. Then select the Start a Program.


3i. Click Browse, and browse to the Land F/X Backup Script file you downloaded in Step 1.
The file may be on your desktop, in your Downloads folder, or in any other location where your downloads go by defaul


3K. Back in the Task Scheduler dialog box, select the Task Scheduler Library option from the left pane.
Locate and right-click the LandFX Backup task you created from within the list of tasks.
Select Properties from the menu that opens.
3L. Select the General tab.
Check the option to Run with highest privileges.
Click OK.

You've successfully created an automatic task to back up your Land F/X data.
Step 4: Test the Backup Task
You can wait until the scheduled task runs, then compare the data and check that it completed the backup. The resulting .sql file will be smaller than the ibdata file, they should still be relativaly similar in size. It's important to ensure you have appreciable size – in other words, make sure the task didn't just create an empty directory. Remember to check the size of the backup you just created after testing.
To complete a manual test prior to the scheduled event, complete the following steps.
4A. Open the Task Scheduler, and select Task Scheduler (local). Use the scroll bar to scroll down to the list of Active Tasks. Double-click your backup task in the list.

4B. Click Run to begin the test.

4C. After the testing is complete, go to the output location of the backup, and right-click the folder with the current date that was just created.
Select Properties from the menu that opens.


4D. Select the Size option in the Properties dialog box.
The size may vary greatly, depending on factors such as the number of projects or the amount of custom content you have.