
Concept Plant Manager: Planting F/X for Revit® Plugin
Updated on: April 28, 2026
- Concept Manager Overview and Concept Design Groups
- Editing a Concept Plant
- Creating a Seed Mix
- Converting Concept Plants to Project Plants
- Using Concept Plants to Represent Existing Plants on Your Site
- Labeling Concept Plants
- Related Webinars
- Troubleshooting
Concept Plants allow you to create a more generalized version of a planting plan while expressing the conceptual intent of the design and plant palette. When using Concept Plants, you'll work with planting groups, which can represent a range of individual plant species or no specific species at all.
These Concept Plants can easily be converted into project plants when you're ready.
The Concept Manager is the control panel for a project's Concept Plan. It allows you to create Concept Design Groups, assign symbols to those groups, and add plants to the Design Group's Palette.
Concept Manager Overview and Concept Design Groups
The Concept Manager allows you to create and organize Design Groups. These groups represent general categories of plant types that apply to the project. Examples of plant Design Groups might include:
- Evergreen Street Tree, Deciduous Street Tree
- Shade Tree, Flowering Accent Tree, Conifer Background Tree, Windbreak Tree
- Large Shrubs, Medium Shrubs, Low Shrub Mass
- Shade Tolerant Shrubs
- Large Accent Shrubs, Small Accent Shrubs, Screening Shrubs
- Low Ground Cover, Prairie Mix
The list of possible plant Design Groups is endless. For each Design Group, you'll assign a symbol to represent that group on the plan. You may then add a plant palette to the Design Group. The plant palette may consist of only one plant if you prefer. However, you may find that including several plants that fulfill the intent of the Design Group offers more flexibility.
We offer two basic methods for creating Design Groups. You can use one of the following methods or incorporate elements of both:
- Create the Design Groups that seem applicable to the project, and add a plant palette to them.
- Create a list of plants that make logical sense for the project and work well together, or simply plants you like or want to use. Then determine the Design Groups that best categorize your plant palette.
Open the Concept Manager:
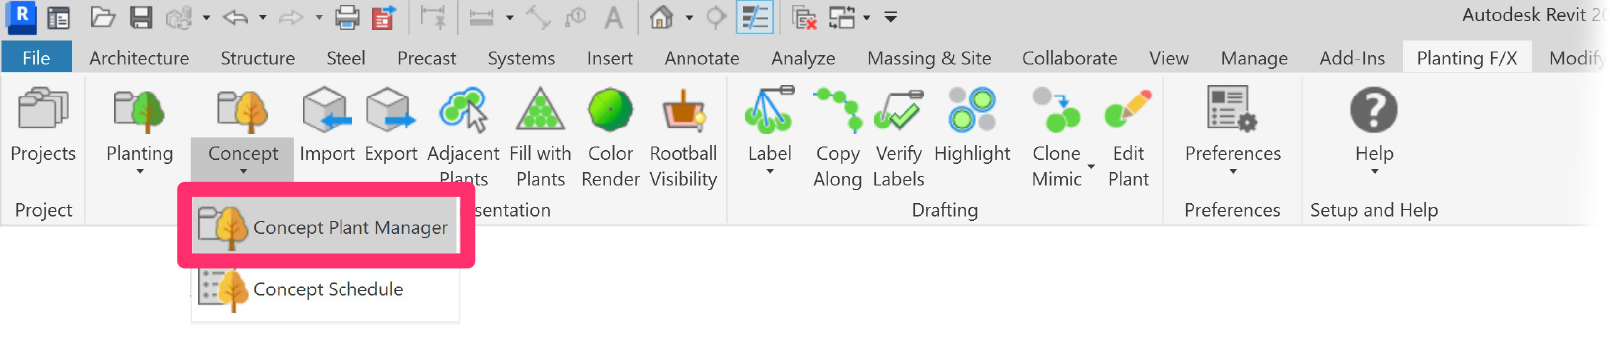
Planting F/X ribbon, Concept Plant Manager button
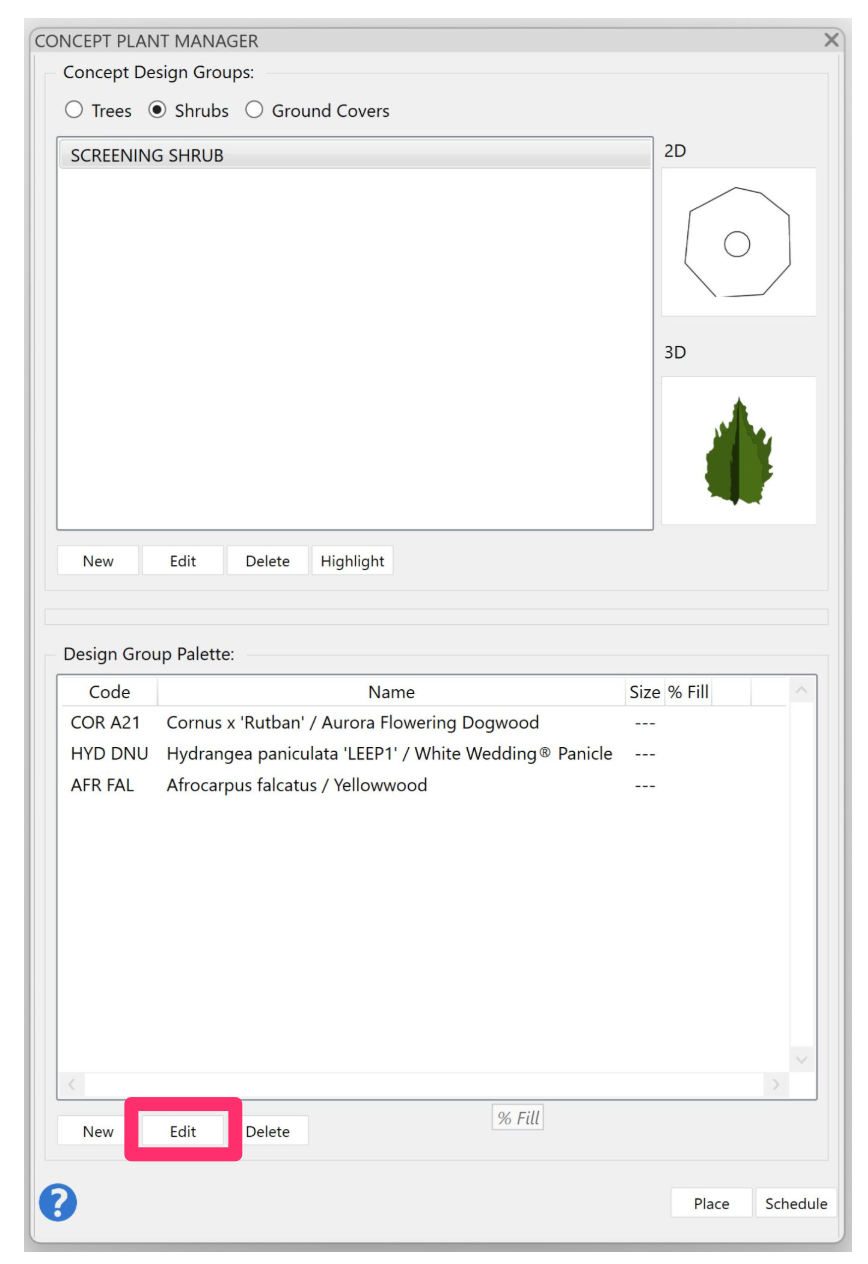
The Concept Plant Manager for your project will open.

1. Plant Design Groups: Trees, Shrubs, Groundcovers
2. List of plant Design Groups you've added to your project
3. Thumbnail images of the 2D and 3D symbol for the selected plant Design Group. For trees and shrubs, you'll select a symbol block to represent the plant. For groundcovers, you'll select a hatch to represent an area that's planted with that groundcover.
4. Options to:
- Create a New Design Group.
- Edit an Existing Design Group.
- Delete a Design Group.
- Highlight all plants from a Design Group that have been placed in your drawing.
5. Design Group Plant Palette: This field lists the plant palette for the highlighted Design Group.
6. Options to perform the following actions on the highlighted Design Group's plant palette:
- Add a New plant.
- Edit a plant.
- Delete a plant.
7. Design Group Palettes for Groundcovers include a Spacing field.
8. Add a percentage fill for each plant in the design group by selecting it and typing the fill in this field.
9. Click Place to place the selected plant directly into your drawing.
10. Click Schedule to place a schedule of all Concept Plants you've placed in your drawing.
Editing a Concept Plant
To make changes to one of your Concept Plants, select it in the Concept Plant Manager and click Edit.
The Plant Info dialog box will open.

1. Plant Name: The botanical and common names for the selected plant. If you want, you can change this information.
2. The Plant Code assigned to the plant.
3. The Group, or subcategory category, of the selected Concept Plant. If you haven't set a subcategory, the plant will simply be grouped into its category (example: Shrubs).
4. Any Remarks, or notes, you want to assign to the Concept Plant – up to 256 characters.
5. Set a detail for the selected Plant, or remove a detail association from the Concept Plant.
6. If you want, set – or edit – a per-unit cost for the plant.
7. The Plant Information Fields, including user-definable information fields.
8. The plant's Symbol Width in feet or meters, depending on your project units.
9. Buttons to toggle between the 2D and 3D symbols, and the photo currently assigned to the selected Plant.
10. Thumbnail image of the Plant's Symbol, if placed as a project plant.
Plant Spacing & Percentage Fills
You can enter a Percentage Fill for plant mixes with two or more plants in a Design Group Palette. The total updates in real time, and will display in red if the total exceeds 100%.
Notes on percentage fills:
- You can go to as high a total percent fill as you need. This is a great trick if you need to include a complete 100% underseeding along with your mix of plants. The individual plant quantity totals will still calculate correctly if the overall percent fill exceeds 100%.
- Mix percentages support decimal numbers, allowing you even more precision in creating your fills.

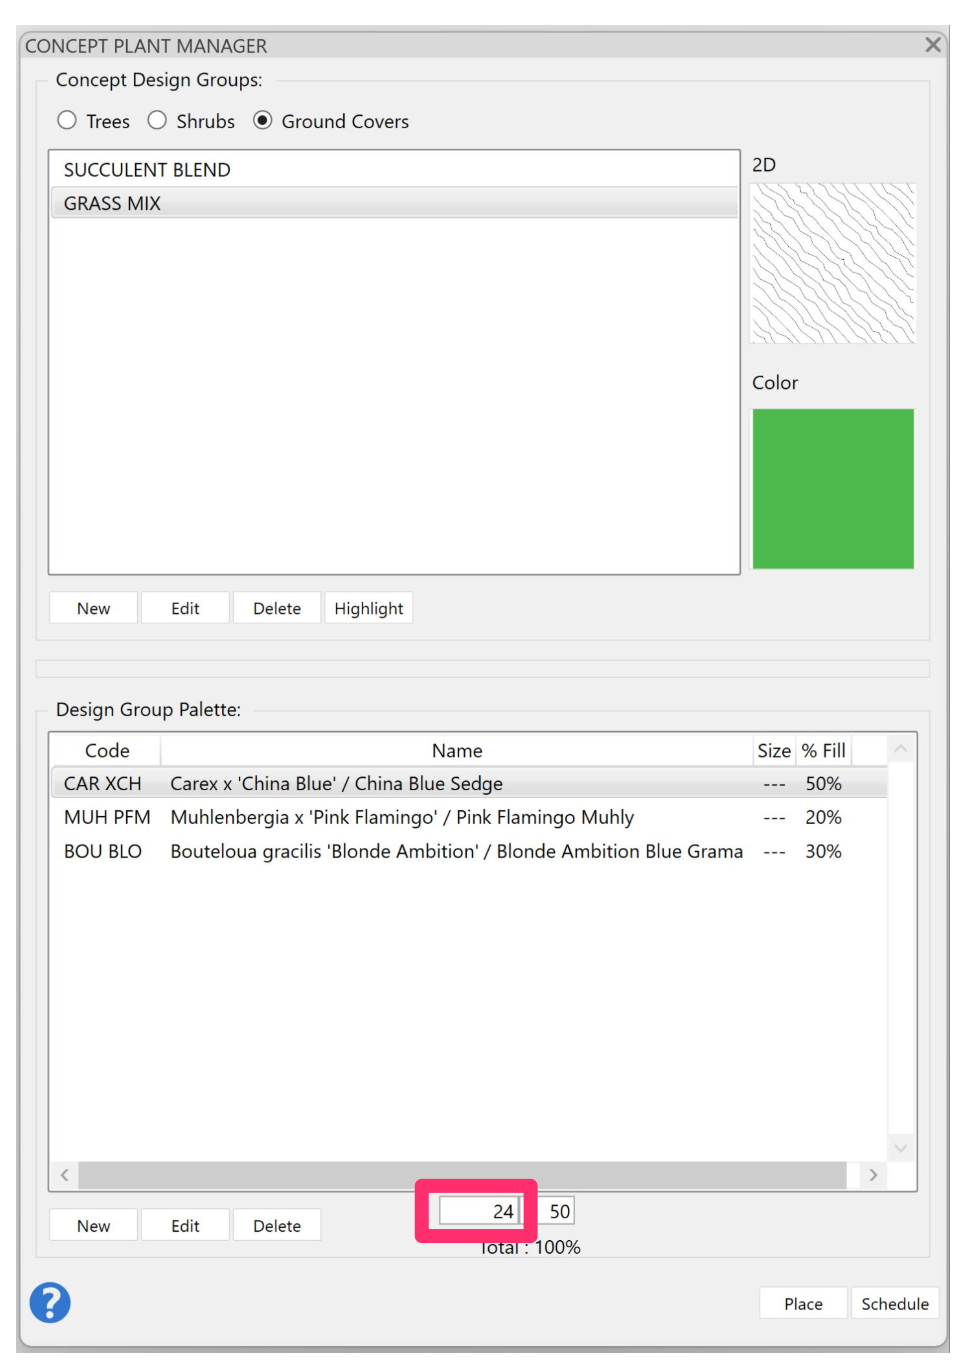
You can add Plant Spacing to Design Group Palette plants created as groundcover Concept Design Groups, which will be reflected in the Concept Plant Schedule.
In the example to the left, we've assigned spacing values of 24 inches for each of our three grasses.
When we place this Concept Plant group in a drawing, the planting area and Concept Plant Schedule will reflect these numbers.
Creating a Seed Mix
If you want to create a custom mix in Revit, use Design Groups in our Concept Plant Manager.
For seed mixes, leave the Plant Spacing field blank. The Concept Plant Schedule will calculate your plant in area (such as square footage) rather than plant quantity.
Converting Concept Plants to Project Plants
When you create a concept plan, the ultimate goal will be to convert your Concept Plants to project plants (that is, actual plants you've added to your plant palette). In the interest of avoiding confusion, it's a good idea to select new symbols for the project plants when you make the conversion. For this reason, we recommend selecting Concept Plant symbols you're unlikely to use in your actual planting plan.
To convert Concept Plants to project plants, use our Mimic Plant tool.
Using Concept Plants to Represent Existing Plants on Your Site
One method for dealing with existing plants on your site is to add them to the Concept Plant Manager as a Design Group. Just create a Design Group called Existing Tree, Existing Shrub, or something similar, then place this group in your plan
If you want to call out the species of the existing tree or shrub, just add the plant species to the Design Group palette for that plant.
Labeling Concept Plants
Ready to label your concept plan? Place labels just as you would for project plants. See our documentation on labeling plants in Revit.
Related Webinars
Quick video
- Planting F/X Revit Tools: Take a refreshed look at how the tools in this plugin work! We'll cover the latest changes such as type parameters, current roadmap, and the basics of how Planting F/X streamlines the process of starting and finishing a planting plan. (1 hr 1 min)
- Getting Started with Planting F/X for Revit: Start your journey with Revit and our Planting F/X plugin. We also present our roadmap for future development and show off some new features such as automatic rootball placement and some recent additions to our collections of families and label styles. (1 hr 22 min)
- Intro to Planting F/X for Revit Plugin: As always, our goal with this plugin is to bring the planting design learning curve as low as possible. We cover installation, Planting F/X projects, the Plant Manager, plant placement as families or floors, group labels, Verify Labels, instant schedules, and rendering options with our default family library. (1 hr 12 min)
- Revit for Planting Design: We focus on more tools and show how to tackle more complex workflows in Revit with Planting F/X. We go over customizing the defaults, implementing some labeling strategies, editing floor types, and working with multiple views. We also showcase some new tools and review our most recent development progress. (1 hr 3 min)
- Importing Plans into Revit: If you're being asked to bring your design into Revit and you're a landscape architect or irrigation designer, this webinar is for you. We'll cover first steps, basic orientation of Revit, the pros and cons of certain strategies, importing the DWG linework either 2D or Civil 3D and making toposurfaces and floors, and first-step methods for importing your landscape and irrigation plans. (1 hr 5 min)
Troubleshooting
Issue: Revit Concept Plants don’t show up in 3D View, but do show up in site view
Issue: You placed a Concept tree or shrub in 2D view in revit, but the symbol did not appear
Issue: The Concept Plant Manager in Revit is extremely slow to load when you first open it
Issue: LandFX: Your license is invalid and this product has not been activated properly on this system
Issue: "Revit Error: The requested dockable pane has not been created yet" message
Issue: "Error: The Currently Loaded Shared Parameter File is Not the LandFX-Shared-Parameters File"
Issue: "This is not a Land F/X plant" error resulting from missing LAFX parameters on placed Concept Plants
Issue: Groundcovers won't place on toposolid subdivisions in Revit 2024 and 2025
Revit® is a restricted trademark of Autodesk®.