Land F/X
  • Portal
  • Products
    • Design F/X
    • Planting F/X
    • Irrigation F/X
    • F/X CAD
    • Plugin for Revit®
    • Plugin for SketchUp®
    • Lighting
    • Plugin for Rhino®
    • Manufacturer Connection
    • Academic
  • Support
  • Videos
  • Who We Are
  • Trial
  • Purchase
Land F/X
  • Portal
    • Dashboard
    • Account
    • Licenses
    • Data
    • Support
  • Products
    • Design F/X
      • Product
      • Features
      • Trial
      • Purchase
    • Planting F/X
      • Product
      • Features
      • Trial
      • Purchase
    • Irrigation F/X
      • Product
      • Features
      • Trial
      • Purchase
    • F/X CAD
    • Plugin for Revit®
    • Plugin for SketchUp®
    • Plugin for Rhino®
    • Site & Hardscape
    • Lighting
    • Manufacturer Connection
    • Academic
    • Purchase
  • Support
    • Knowledge Base
    • Documentation
    • Submit Ticket
    • Updates
    • Forum
    • Install
    • Remote Assistance
  • Videos
    • Power Tips
    • Webinars
  • Who We Are
    • Contact Us
    • Careers
    • Gallery
    • News
  1. Knowledge Base
  2. Site & Details
  3. Hatches
  4. Editing and Creating Custom User Hatch Subcategories

Remove Hatch from Internal Objects Within a Hatched Area

Issue

You need to remove the hatch from sections within a hatched area in your drawing.


The example to the right shows a hatched area that includes stepping stones. We'll show you how to remove the hatch from these internal areas.

When placing a groundcover, Reference Note, or other type of hatch, you can use the Multiple option to exclude internal areas from the hatch. The following steps show how to remove the hatch from internal areas if you didn't use the Multiple option when placing that hatch initially.

Hatched area that includes stepping stones


Solution

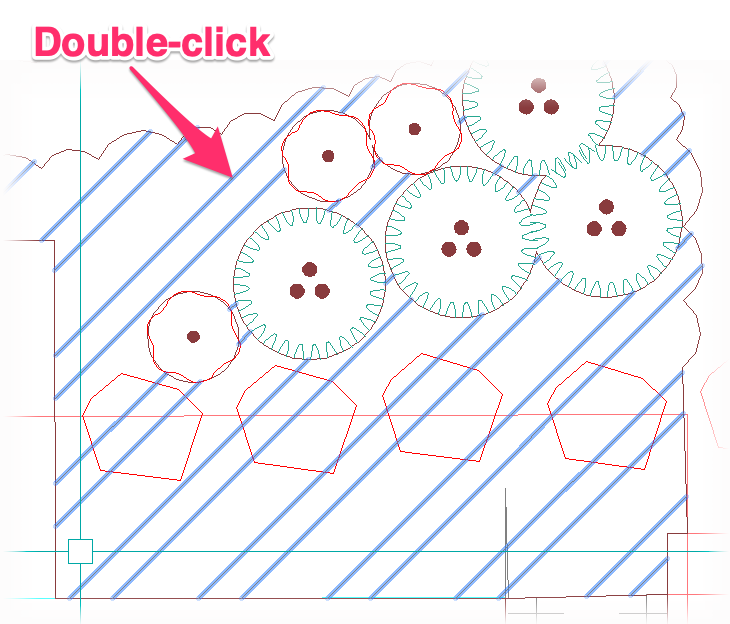
DOuble-click the hatch pattern

1. Double-click the hatch pattern (not the hatch boundary).


2. The Hatch Editor will open. Click Pick Points.


Hatch Editor, Pick Points option


3. Type S in the Command line and press Enter.


4. The cursor will turn into a pickbox. Select each of the internal areas where you want to remove the hatch.


In this example, we'll select each of the stepping stones.


Press Enter when finished selecting all the objects that will have the hatch removed.

Select internal areas to remove hatch


Hatch removed from internal areas

The hatch will be removed from each of the internal areas you selected.

If you used these steps with a groundcover or Shrub Area, run our Verify Labels tool to update the quantities. Run our Verify Callouts tool if you used these steps on a Reference Note hatch.

Contact

  • Land F/X
  • PMB 351
    3940 Broad St. STE 7
    San Luis Obispo, CA 93401
  • +1 805-541-1003
Email Logo Facebook Logo Instagram Logo LinkedIn Logo
Land F/X Logo

Our software tailors AutoCAD®, Revit®, and SketchUp® to the needs of landscape architects, irrigation designers, and other professionals. We automate your most tedious tasks and ensure accuracy, giving you more time to design.

  • Portal
  • Products
  • Support
  • Videos
  • Who We Are