
Switch to Cloud (Cloud Data and Cloud Licensing)
Updated on: December 11, 2025
The following steps show how to transition from a local- or server-based installation of our software to a Cloud setup, where your Land F/X data is hosted online (aka "on the cloud").
Quick video

Additional resources:
- Want more information about what a cloud setup can do for you? Watch our Cloud Data webinar.
- Do you have questions about the security of a cloud setup? See our Cloud Data security protocols.
Step 1: Update to the latest version
Use our Update tool to verify that you are on the latest version of Land F/X. If not, update to the latest version.
Step 2: Back up your Land F/X data locally
Open our Projects tool:

F/X Admin ribbon, Project List button

F/X Admin pull-down menu

Admin Data toolbar

F/X Admin toolbar
or type FX_ProjectFiles in the Command line
In the Land F/X Projects dialog box, click Backup.

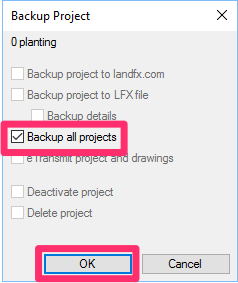
The Backup Project dialog box will open.
Check the box to Backup all projects. Then click OK.
All your projects and Preference Sets will be backed up.
Step 3: Check in all your office's Land F/X licenses (i.e., move them to the cloud)
This step will designate all your office's Land F/X licenses as Unassigned, meaning they're accessible from the cloud.
Open CAD from any Land F/X workstation in your office, then open the Land F/X General Preferences screen:

F/X Admin ribbon, General button

Several toolbars (F/X Admin toolbar pictured)
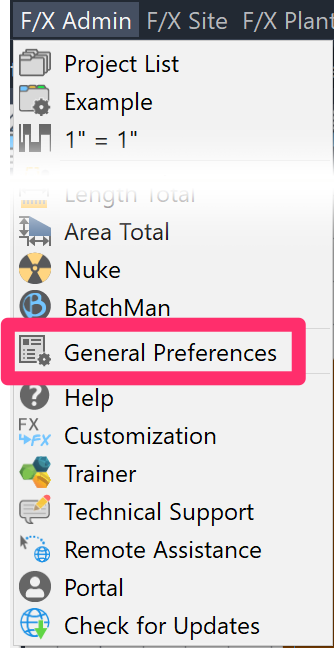
F/X Admin pull-down menu
or type *FXPreferences in the Command line
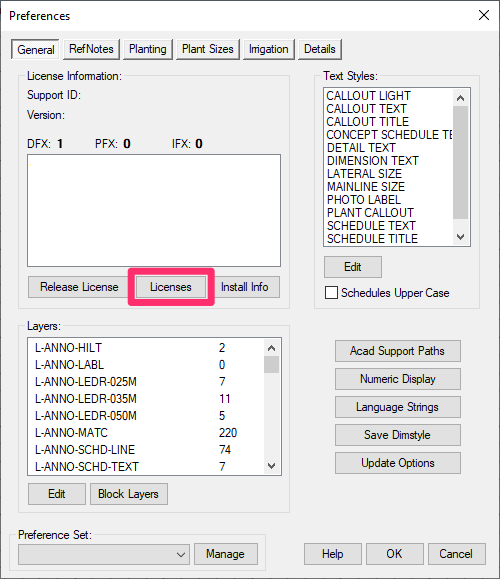
In the General Preferences screen, click the Licenses button to open the License Manager.

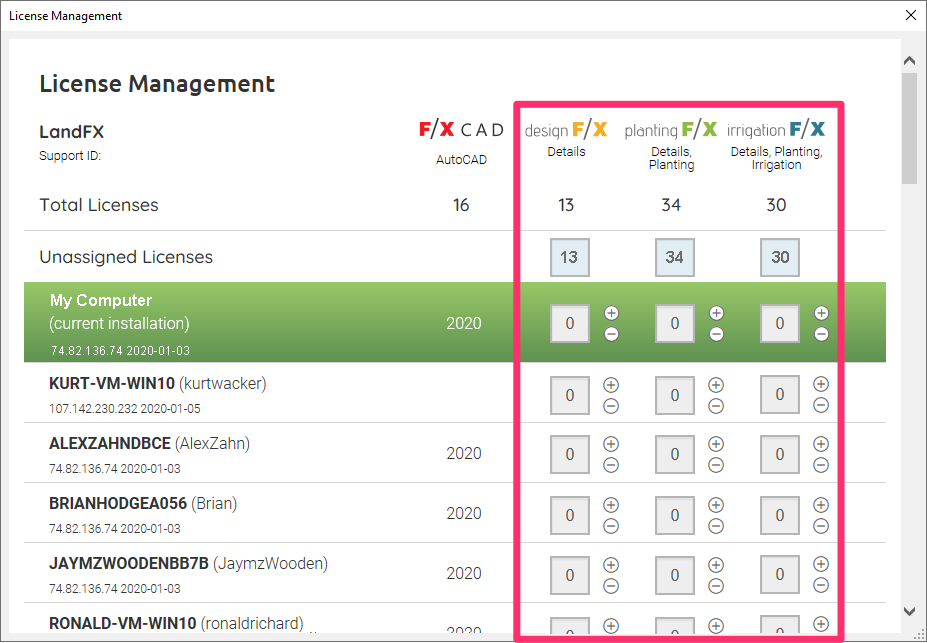
Scroll through all your office's Land F/X users and check in all licenses.
If a user has one or more licenses checked out, you'll see a number other than 0 for that license type next to that user's name. In this example, the user My Computer has one Detail F/X license checked out.
To check a license in, click the minus (-) sign to the right of the license count, as pictured to the left.
After you've checked in all your office's licenses, verify that the number of each license type in the Unassigned Licenses row matches the number of that license type in the Total Licenses row near the top of the License Manager.
All your office's Land F/X licenses should now be unassigned, meaning they're accessible from the cloud. All users should have a 0 entered for each of the three license types.
Step 4: Select Cloud Data
Important note: We do not recommend mixing Cloud and Local Data setups for the same office. Instead, choose one or the other.
To select Cloud Data, type ENTERPRISE in the Command line, and press Enter. The Installation dialog box will open.
1. Enter your Local office Support ID.
2. Enter your Company-wide Cloud License Code.
Don't know your Company-wide Cloud License Code? In most cases, it will be identical to your Local office Support ID. However, when multiple office locations are sharing a single pool of licenses, each office will have its own Support ID but all offices will share a single Company-wide Office Code. Don't know your Company-wide License Code? Send us a support ticket and we'll provide it.
3. Check the option to Use cloud data.
4. Click OK.

Your installation will now be switched to Cloud Data.
Keep in mind:
If you or your office has two or more Single-User installations, you will need to complete this step from each Land F/X workstation in your office, as well as any laptop or home computer where you plan to use Land F/X.
If you have a multi-user installation, where several workstations are accessing our software from a central office server or shared online folder, you only need to complete this step on one of the workstations
Step 5: Submit a tech support ticket
This step will verify that your configuration is correct and that our system recognizes your machine on our cloud system.
Please include the following text in your support ticket where indicated:
- Ticket Subject: Cloud Data Verification.
- Description: Please verify that my computer is using Cloud Data correctly.
Don't remember how to submit a ticket? Here's how.
Step 6: Restore your Land F/X data
Choose an employee to restore Land F/X projects, templates, and Preference Sets (LFX files), retiring older projects that aren't being accessed anymore.
The quickest and easiest way to bring in your Land F/X data from your local backups is to follow our steps to restore your Land F/X data from the Land F/X Portal.
This method allows you to bring in all your Land F/X data at once rather than restoring one LFX file at a time.
If you'd rather bring in each of your existing LFX files one at a time, you'll use our steps to restore projects, templates, and Preference Sets manually. First, open the Land F/X Projects dialog box as described in Step 1 above.
In the Land F/X Projects dialog box, click Restore.


The Restore Project dialog box will open.
Depending on where you've backed up your projects and Preference Sets, click either Download or Import.
Clicking Import will open the Select LFX File to Import dialog box.
In most cases, your projects and Preferences Sets will be backed up to the folder LandFX\data\backup on your computer or server.


To restore a project or Preference Set, navigate to it, click it, and click Open.
Important:
If any of your Preference Sets are associated with customized Detail Templates, you'll need to restore the Preference Sets in the exact order in which they were created, to match the Template numbers. More about Detail Templates & Preference Sets
If you've already restored your Preference Sets and you find that your Detail Templates are coming in incorrectly, you can follow our steps to correct this issue.
If you've selected a project, you'll see the existing project name and be prompted to keep or change that name. If you decide to keep the same name, you'll be asked if you wish to overwrite the existing project on the list with that same name.
If you want to keep or change the name, you can do so now and click OK.
Restored projects will be available in the Land F/X Projects dialog box. Restored Preference Sets will be available from the Preference Set menu at the bottom of any of our six Preferences screens.
Our Restore feature requires you to restore projects and Preference Sets one at a time.
Close
Step 7: Disable your MySQL server
If you are using a Single-User installation – a Land F/X installation that does NOT use a server – you'll need to disable your local MySQL service to avoid any potential conflicts with your old installation of our software.
Step 8 (optional but recommended): Use Land F/X with a shared online location
Does your office already have a shared LandFX folder on an online folder sharing system such as Dropbox, SugarSync, or Carbonite? If not, we highly recommend it. Follow our instructions to use Land F/X with a shared online folder.
Do you already have your LandFX folder stored on one of these shared folder systems? Make sure it's mapped to a letter drive.